JENCHA PIXEL / DOCS
USER GUIDE
Create pixel art for free, work with layers and preview collection setups. Use Pro to generate and export complete collections.
This guide describes the current public JENCHA Pixel 1.0 release. Updated on 30 October 2026. Button names refer to the English interface. A layer is a separate sheet of artwork. ⌘ means Command and ⌥ means Option.
Documentation for JENCHA Pixel 1.0 · Available on the Mac App Store · Updated 30 October 2026
01 / GUIDE
Your first drawing
- Click New project on the Home screen.
- Choose 32 × 32, then Create project.
- Click a palette color on the right.
- Choose Pencil on the left, or press B.
- Click or drag on the canvas to draw. Press ⌘Z to undo a mistake.
- Click Save, choose a name and folder, and save your
.jenchapixelproject. - To share your picture, click Export… and export a PNG. See chapter 12.
The checkerboard means those pixels are transparent. The checkerboard itself is not part of your exported image.
Your project file keeps your editable artwork. A PNG is the image you can share. Save your project even when you have already exported a PNG.
Back to top02 / GUIDE
Create or open a project
Choose a preset of 16 × 16, 32 × 32, 64 × 64 or 128 × 128 pixels. Choose Custom to enter a width and height, each a whole number from 1 to 1024. Rectangular canvases are supported.
These dimensions count artwork pixels, not the size of your window. This version cannot resize an existing canvas. Zoom in for a larger view, or choose a larger export scale for a larger output image.
Use Open project to open a .jenchapixel file. You can also click a recent project on Home. Its folder name and, when available, canvas dimensions appear beneath the name. A label such as ‘outputs’ is the folder name, not a project type.
The app follows native macOS language settings. English and Dutch are supported; unsupported languages fall back to English. There is no in-app language selector. Names you give to projects, layers and groups are never translated.
Back to top04 / GUIDE
Drawing tools
Edits affect the active layer. With an active selection, Pencil, Eraser, Fill, Line and Shape only change pixels inside that selection. Press ⌘D to draw freely again.
Pencil — B
Choose a color and drag to draw. Size ranges from 1 to 32 px. The outline around the pointer shows the square brush footprint.
Click Opacity 100% to open its slider. Lower values make new strokes more transparent. Overlapping parts of one continuous stroke do not repeatedly build up opacity. A new stroke over the same area can increase it.
Pixel-perfect is available at 1 px. It removes redundant corner pixels while drawing diagonal strokes. It does not automatically clean up an entire drawing.
Eraser — E
Choose a size from 1 to 32 px and drag. Eraser makes pixels fully transparent on the active layer, which may reveal layers below. It has no separate opacity slider.
Fill — G
Click a pixel to fill its connected area of exactly matching color and transparency. Pixels connect through their sides, not just through their corners.
Fill reads the active layer. An outline on another layer does not stop it. An active selection acts as a hard boundary; clicking outside it fills nothing.
Eyedropper — I
Click a visible color in your artwork to sample it and return to Pencil. Eyedropper reads the displayed image, including visible layers. Fully transparent pixels provide no color. Sampled colors do not retain the source pixel’s transparency.
Use ⌥ + click to sample temporarily without changing your current tool.
Line — L
Click the start point, drag to the end point and release. A preview follows your drag. Size and opacity are shared with Pencil. On release, the line becomes ordinary pixels. Esc cancels a pending preview.
Shape — U
- Choose Rectangle or Ellipse.
- Choose Outline or Filled under Mode.
- For Outline, set Size from 1 to 32 px. The outline grows inward. Size does not apply to Filled shapes.
- Set Opacity if needed.
- Drag from one corner of the desired area to the opposite corner, then release.
Hold Shift while dragging to make a square or circle. The preview follows this constraint. Shapes stay aligned to the pixel grid without softened edges. After release, they are ordinary pixels, not editable vector objects. Esc cancels a pending preview.
Move — V
Without a pixel selection, click visible artwork to automatically select the topmost visible, unlocked layer with a nontransparent pixel there, then drag immediately. The matching row is selected in Layers. Empty space changes neither the selection nor the artwork. Hidden layers/groups and locked layers are skipped. With an active pixel selection, drag inside the selection to move only that region on the active layer; auto-selection does not replace this workflow.
With V active, arrow keys move by 1 pixel; Shift + arrow moves by 10. Space + drag only moves your view.
Move expands the matching group when needed and brings the selected layer into view. Layer multi-selection does not move several layers’ pixels together.
Back to top05 / GUIDE
Select, copy and paste
- Choose Selection (M).
- Drag a rectangle around the area you want.
- Press ⌘C to copy, ⌘X to cut or Delete to erase its pixels.
- Press ⌘V to paste.
- Drag inside the pasted area to position the copy. You do not need to click somewhere else before pasting.
Copy and Cut use only the active layer, not all visible layers combined. You may choose another layer before pasting. You can also copy between JENCHA Pixel documents if the copied area fits inside the destination canvas.
Paste uses the position of an existing selection, or centers the copy when there is no selection. Paste is an edit you can undo with ⌘Z. You can then drag the pasted copy without removing the original artwork.
A selection stays active when you change tools or layers. This lets you edit the same canvas area on different layers. ⌘D removes the selection without erasing pixels. ⌘A selects the entire canvas. To draw a new selection with M, start outside the current selection or deselect first.
Esc cancels a pending selection drag. Without a pending preview, it deselects. Selections are not saved in project files.
Paste expects a selection copied within JENCHA Pixel. For an image from another application, use Import PNG…. Directly pasting a Photoshop image is not supported here.
Back to top06 / GUIDE
Colors and palette
Click Choose color… on the right or the color swatch on the left to open the native macOS color picker. The current color also appears as a HEX value such as #E0464A.
Click a palette color to use it. This selects Pencil unless Fill is active. The + below the palette adds the current color. − removes that color from the palette without changing existing artwork pixels.
The palette is saved with the project and holds up to 256 colors. Enlarge the COLOR section or scroll within the palette to see more colors. Use tool opacity for transparent drawing; the color picker has no alpha control.
Quick Shades
Directly below the HEX value, five small color swatches offer −20%, −10%, current color, +10%, +20%, from left to right. The outlined center swatch is your exact current color. Hover over a swatch for its label, such as Darker 20%, Current color or Lighter 10%.
Click a swatch to make it your drawing color. Fill stays active if selected; otherwise, Pencil is selected, just as when choosing a palette color. The five shades immediately recalculate around the new color, so you can lighten or darken it again in small steps. Changing color with the picker, palette or Eyedropper also updates the row.
The percentages adjust HSL lightness by 10 or 20 percentage points, keeping hue and saturation as close as possible. Near black or white, adjacent swatches may match because lightness cannot go below black or above white. Quick Shades does not add transparency or change existing pixels.
A chosen shade is not added to the palette automatically. To keep it, click + below the palette, then Save the project. Use the shade with your drawing tool to apply it to the artwork.
Quick Shades verified on 26 September 2026.
Back to top07 / GUIDE
Work with layers
Layers sit on top of each other. The top layer in the list appears in front. Click a layer name to make it active; a highlight and checkmark identify it.
The bottom of LAYERS contains Add layer (+), Create group (folder), Duplicate layer (two squares) and Delete layer (trash). Hover over a button for its description.
- Rename: enter a name above the list and click Rename or press Enter.
- Show/hide: click the eye. Hiding does not delete pixels.
- Opacity: click the percentage to open its slider. This changes the appearance of the entire layer without replacing its stored pixel colors.
- Reorder: drag the handle on the left. The insertion line shows the destination. The bottom arrow buttons move a layer one position within its group or among ungrouped layers.
- Right-click: batch actions target the current selection if the clicked row belongs to it; otherwise they target the clicked layer.
A new layer appears above the active layer and inherits its group. At least one layer must remain. The maximum is 256 layers, but large canvases reach the memory limit sooner: a 1024 × 1024 canvas allows up to 16.
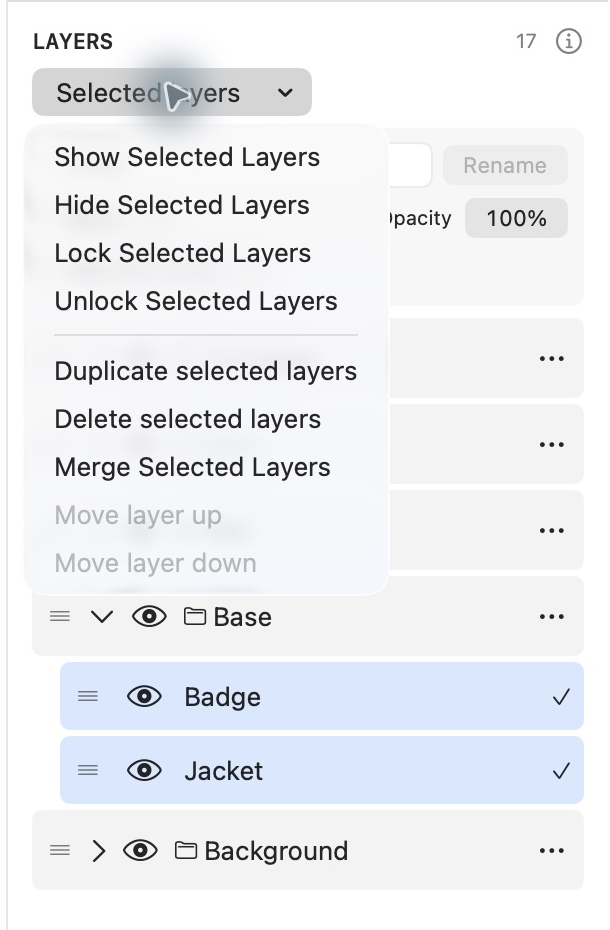
Select several layers and act on them together
- Plain click selects one layer. ⌘-click adds/removes a layer. Shift-click selects the visible range from the anchor; ⌘-Shift-click adds that range. Collapsed group contents are not part of a visible range.
- Selected rows have a blue/accent highlight and a checkmark. Drawing still affects one active layer, not every highlighted layer.
- Open Selected layers above the list, or right-click a selected row. Show/Hide and Lock/Unlock apply one consistent state to the whole selection. Clicking an eye on a selected row sets all selected layers to that row's new visibility.
- Duplicate/Delete and the bottom buttons act on the selection. At least one layer must remain; duplication respects the project capacity. Deletion and pixel edits are blocked on locked layers. A small lock marks them; locks are saved with the project.
- Reorder via a selected row's handle or the arrows. Selected layers keep their relative order and move as a block within the same parent/group. Mixed-parent or locked selections cannot be reordered together. This is layer-stack reordering, not simultaneous canvas movement.
- Right-clicking an unselected row targets that row for batch actions. Rename, opacity and group assignment remain single-layer controls.
Merge Selected Layers
In Selected layers or the right-click menu, choose Merge Selected Layers. Select at least two adjacent, visible, unlocked layers in the same group (or all ungrouped). They become one Merged layer at the same stack position. ⌘Z restores the originals; ⇧⌘Z repeats the merge.
A mixed-group, nonadjacent, hidden or locked selection is rejected with an explanation. The app also checks the exact final pixels: if transparency/opacity rounding would change the image, it refuses the merge. Keep those layers separate. Merging changes layer names/structure and therefore may change traits or require a new collection; save a source copy before simplifying collection variants.
08 / GUIDE
Organize layers into groups
- Select an ungrouped layer.
- Click the folder button below LAYERS to create a group containing it.
- Double-click the group name to rename it, or use its right-click menu.
- Select another layer and use the group menu above the list, or Move to group in its right-click menu, to add it.
If the active layer already belongs to a group, the folder button creates a new empty group and preserves the existing group.
Use the chevron to collapse or expand a group and its eye to hide all its contents. Drag the group handle to reorder the group and its layers together, preserving their internal order. Collapsing a large group can make dragging easier.
Remove from group makes a layer independent. Ungroup (keep layers) removes only the grouping. Nested groups are not supported. Empty groups have no artwork stack to move and appear at the top.
Moving a group in the list changes stacking order. It does not move all its pixels together across the canvas; that operation is not available.
Back to top09 / GUIDE
Flip and rotate
Select a layer and open Flip and rotate, or right-click the desired layer and open that submenu. Choose a horizontal or vertical flip, or a 90° clockwise or counterclockwise rotation.
These operations affect the whole layer, even with an active pixel selection. The canvas dimensions stay fixed. Pixels outside its edges are cropped; ⌘Z can undo the operation. A 90° rotation on a rectangular canvas may therefore crop artwork. Free rotation and scaling are not available.
Back to top10 / GUIDE
Import a PNG
- Check the PNG’s pixel dimensions.
- Open or create a project with exactly the same width and height.
- Click Import PNG… and choose the file.
- It becomes a new layer above the active layer, inheriting its group if applicable.
A 64 × 64 PNG requires a 64 × 64 canvas. The app does not automatically resize it. Transparency is retained. Use a regular, non-animated PNG; this button does not import PSD, JPEG or SVG files.
If the new layer exists but you cannot see the image, check both its eye and its group’s eye. Importing into a hidden group hides the new layer too. Also check opacity and whether higher layers cover it.
Back to top11 / GUIDE
Save projects
Save / ⌘S saves your artwork as .jenchapixel. Use Save As… for another name or location. Save regularly, especially before major edits.
The project contains pixels, layers, groups, names, visibility, layer opacity, metadata choices, the palette, layer locks and Project Details. Zoom, the active selection, tool settings and undo history are not saved as a persistent workspace.
The app uses native macOS autosave and recovery. Recovery has been tested, including a document never manually saved. It cannot guarantee recovery of the very last change before a crash. Keep saving manually and maintain backups.
A PNG does not retain separate editable layers. Keep your project file as well.
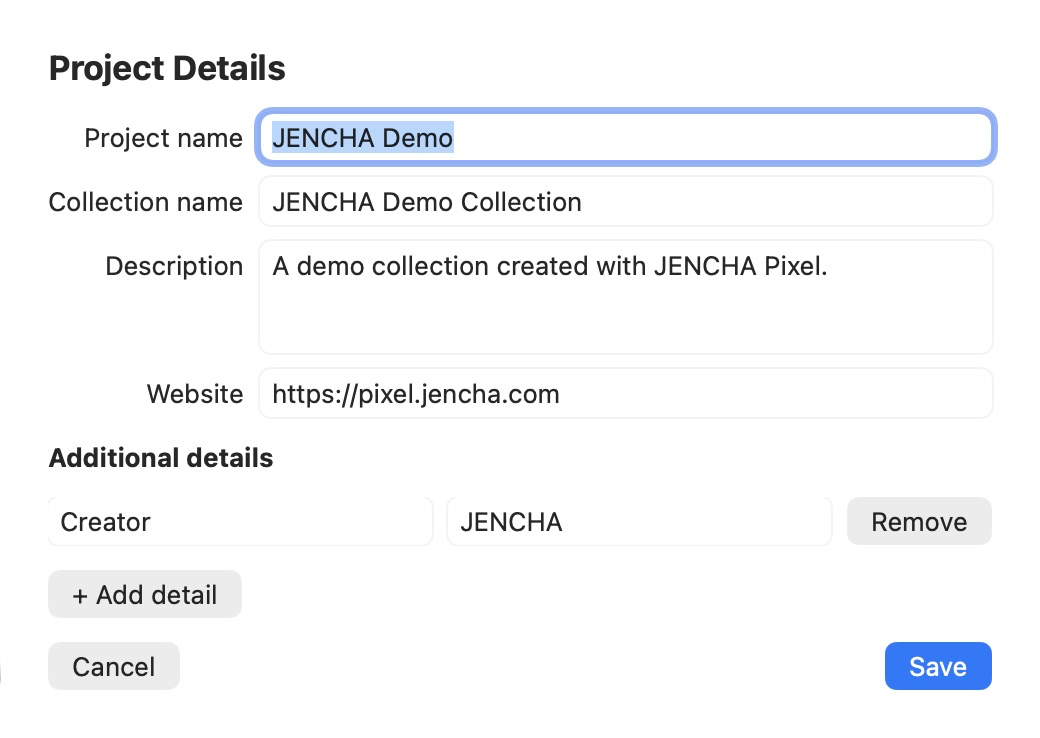
Project Details…
Use Project Details… in the top toolbar to enter information once and reuse it during export. In a narrow window the text buttons wrap onto a second toolbar row.
| Field | Meaning |
|---|---|
| Project name | Required internal project title. Older projects initially suggest their filename; an unsaved project suggests Untitled. Changing this field does not rename the file. Use Save As… to rename the file. |
| Collection name | Optional collection title for Bitcoin metadata. It also suggests the name when starting a new collection; that export name can be changed independently. |
| Description | Optional description, reused in both metadata formats. |
| Website | Optional complete http(s) URL, e.g. https://pixel.jencha.com, reused unchanged as Website / external_url. Invalid input blocks Save; leave empty if unused. No automatic prefix or invented image address. |
| Additional details | Your own text fields, such as Creator = JENCHA or License = CC0. Use + Add detail, edit Key/Value, or Remove. These fields appear only in Bitcoin metadata. |
Click Save in the panel to apply the details, then save your project with ⌘S. Save, Save As, closing and reopening retain them. Project name and Collection name remain independent. Existing projects open without requiring these fields to be filled. Blank optional values are omitted from export. Avoid duplicate field names or trait names matching Name, Collection, Description or Website: the app blocks ambiguous flat metadata rather than overwriting a value.
Details and layer locks require the current project format. Older projects remain readable in this app; an older app build may not open a project saved with these additions. Keep backups when exchanging files with an older build.
12 / GUIDE
Export a PNG
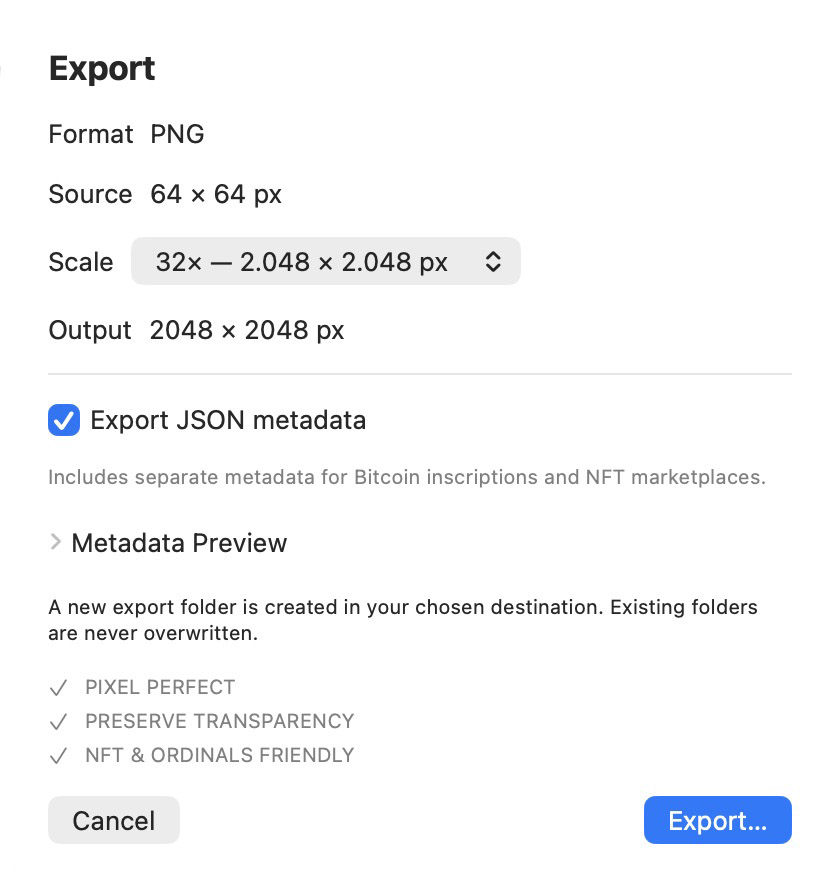
Single Item export is Free. Export a PNG, or turn on optional JSON to include both Bitcoin Inscription Metadata and NFT Marketplace Metadata. No Pro subscription is required. Single Item creates no collection numbering or saved collection state.
- Show the layers and groups you want included. Hidden contents are not exported.
- Click Export…, then Single Item.
- Choose Original (1×), 2×, 4×, 8×, 16×, 32× or 64×. Check the output dimensions; the initial scale is 32×.
- Leave Export JSON metadata off if you only need an image.
- Click Export…, choose a folder and filename, and confirm.
For example, a 32 × 32 canvas at 16× produces a 512 × 512 PNG. Each artwork pixel becomes a sharp 16 × 16 block. Your viewing zoom does not affect export.
Export includes the entire canvas, not just an active selection. It includes transparency and layer opacity, but not the grid, selection outline or pointer.
The suggested filename comes from your project and can be changed. JENCHA Demo.jenchapixel suggests JENCHA Demo.png. No automatic suffix such as -0001 is added.
If the output is too large, choose a smaller scale. Export is capped at 67,108,864 output pixels, described approximately as ‘64 million’ in the message. Replacing an existing file requires confirmation. Cancelling writes no new export files.
With no saved project filename, PNG-only suggests Artwork; the filename remains yours to choose. For PNG plus both metadata formats, see JSON export. For all five export choices, see Collection Builder.
13 / GUIDE
Use groups as traits
This chapter is optional. You do not need metadata to draw or share a PNG.
A trait describes something in your artwork: for example, category HAIR, value Blond. JSON export uses the group name as the category and the layer name as the value.
- Create a HAIR group with layers such as Blond and Brown.
- Show only the variation used in your artwork.
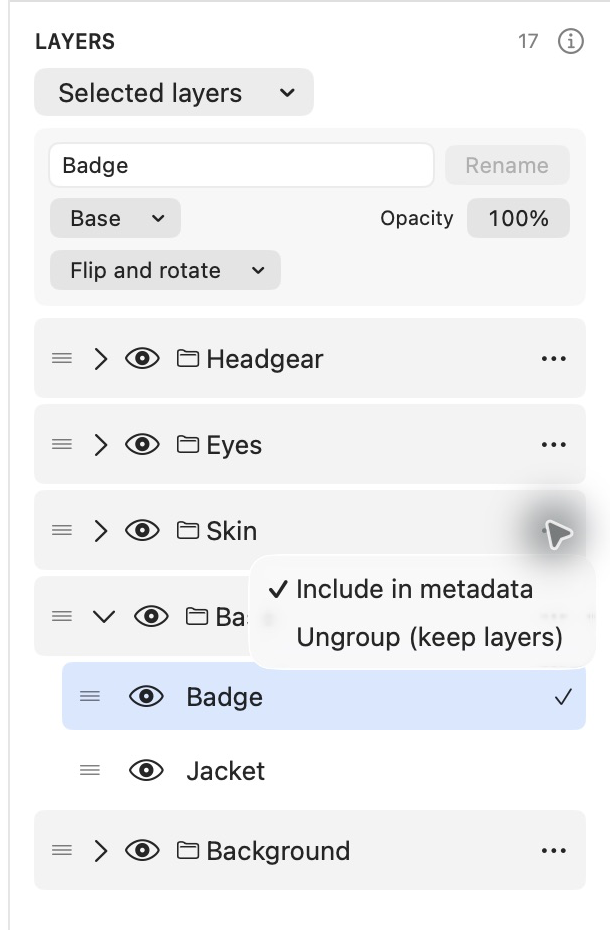
- Open the group’s three-dot or right-click menu.
- Keep Include in metadata enabled for groups that should supply traits.
- Turn it off for a group used only to organize your drawing. This does not change the image.
Each included, visible group may have at most one active layer supplying a trait. Active means the layer is visible, has opacity above zero, and contains pixels that are not fully transparent after layer opacity is applied. A layer completely covered by higher layers may still count.
No active layer means no trait for that group. Ungrouped layers do not supply traits. Use distinct category names to keep your exported data clear.
14 / GUIDE
Export JSON metadata
Single Item export is Free. Export a PNG, or turn on optional JSON to include both Bitcoin Inscription Metadata and NFT Marketplace Metadata. No Pro subscription is required. Single Item creates no collection numbering or saved collection state.
- Prepare groups as in chapter 13 and optionally fill Project Details… (chapter 11).
- Open Export… Single Item and enable Export JSON metadata.
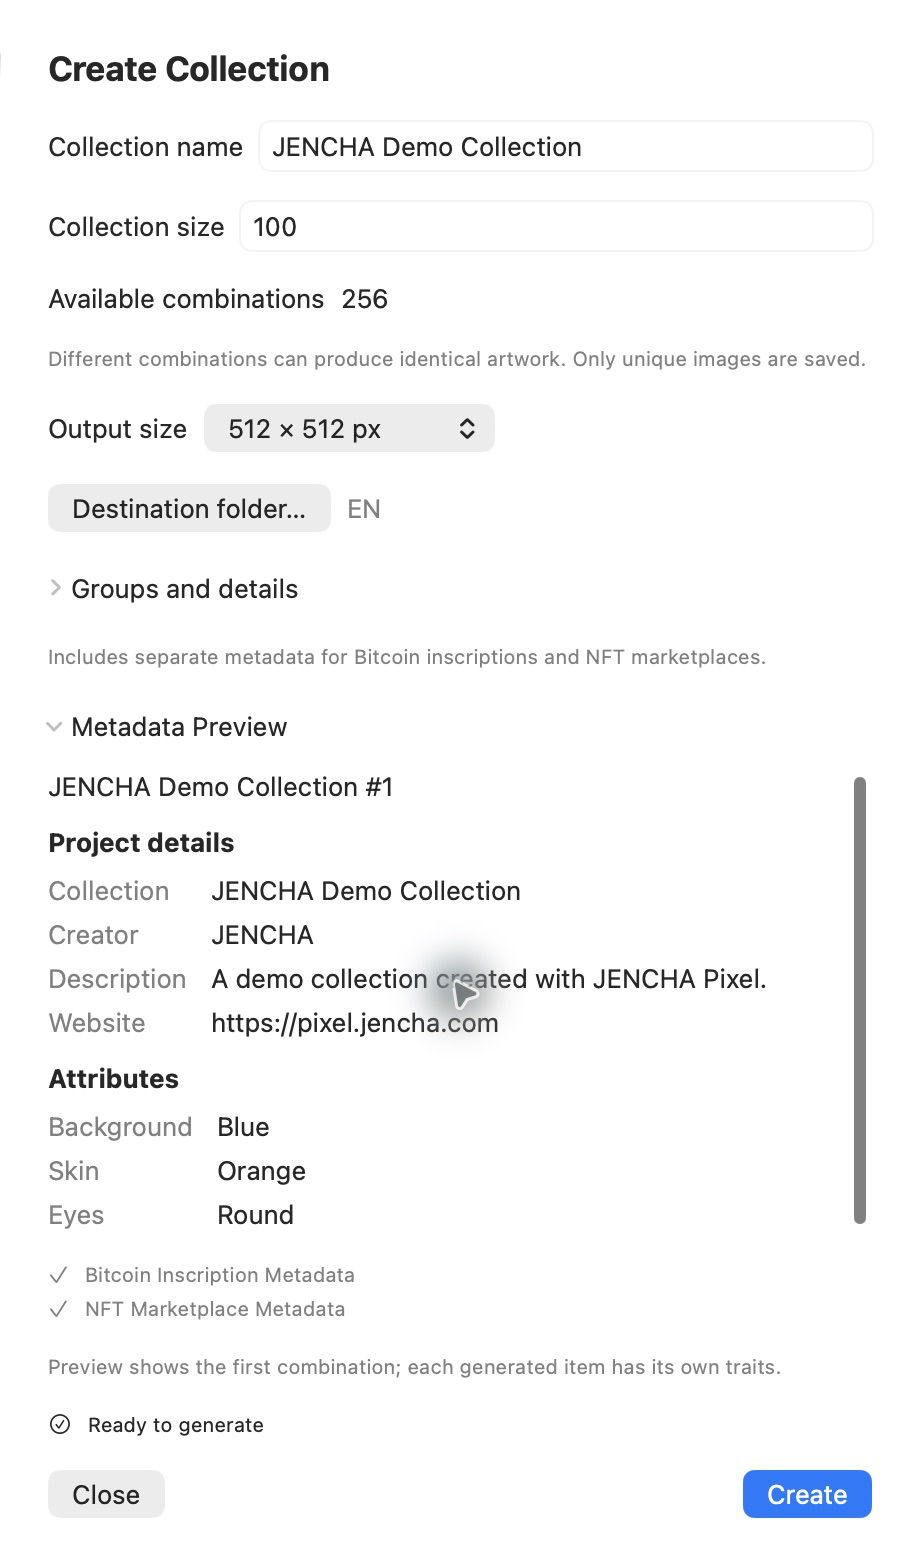
- Review Metadata Preview: Name first, then Project details and Attributes as compact key/value rows. Two checkmarks confirm Bitcoin Inscription Metadata and NFT Marketplace Metadata. There are no separate format sections or schema controls.
- Choose the scale and click Export…. Choose a destination folder. The app creates a new
<project filename> Exportfolder. For an unsaved document it uses Project name, or Artwork if details are absent.
For a project called my-artwork.jenchapixel:
my-artwork Export/
  Images/my-artwork.png
  Bitcoin Inscription Metadata/my-artwork.json
  NFT Marketplace Metadata/my-artwork.json
One checkbox makes two metadata versions automatically; there is no schema or platform selector. All three files have the exact same basename. No -bitcoin or -marketplace filename suffix is added. The folder names stay in English in both interface languages.
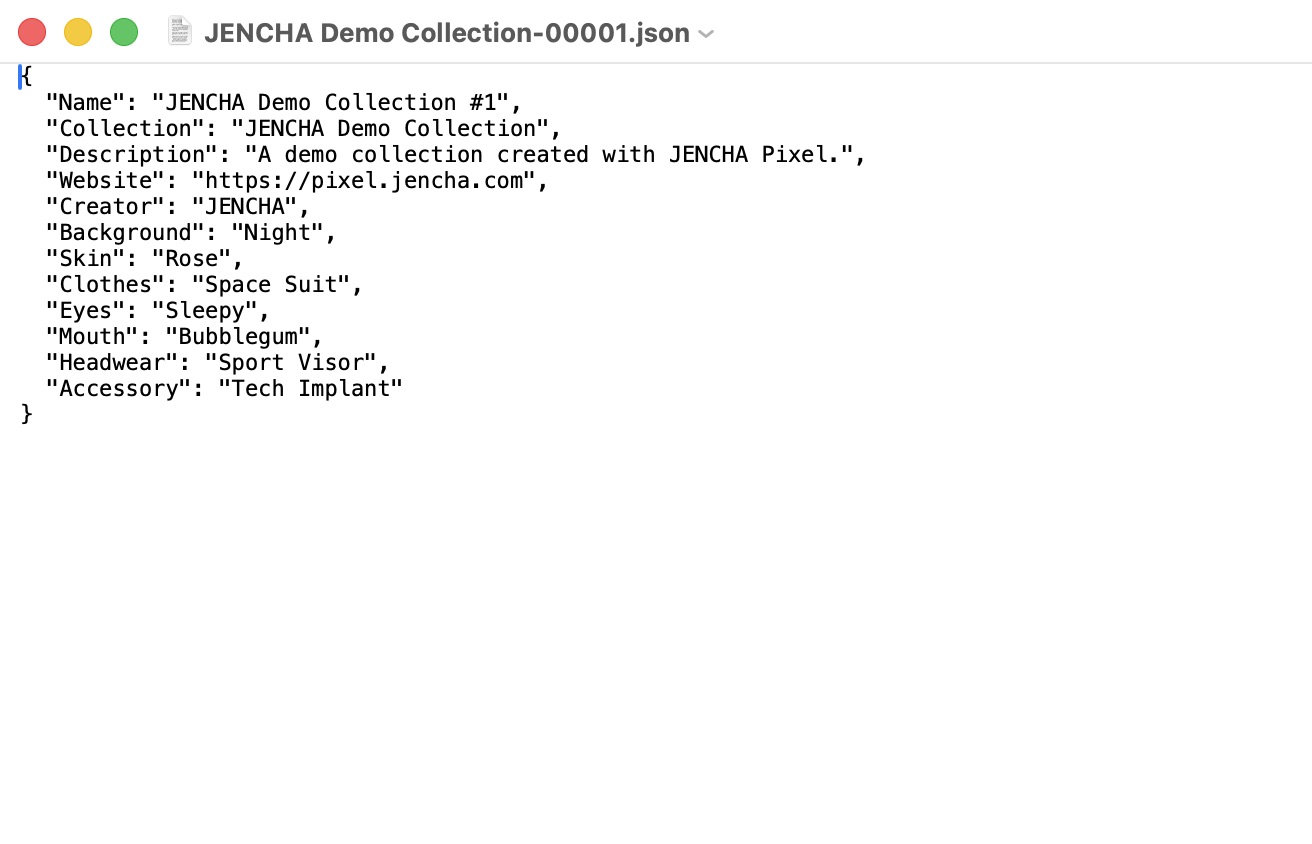
Bitcoin Inscription Metadata contains readable text fields: Name, optional Collection, Description, Website, your Additional details and the included traits. For example, "Creator": "JENCHA" and "HAIR": "Blond".
NFT Marketplace Metadata retains the standard structure:
{
  "name": "my-artwork",
  "description": "A pixel art study.",
  "external_url": "https://pixel.jencha.com",
  "attributes": [{ "trait_type": "HAIR", "value": "Blond" }]
}
Description and external_url are absent when empty. Custom details and Collection are not inserted into marketplace JSON; there is no assumed safe mapping. No fictitious image URL is added. Without traits, attributes is an empty list. For Single Item, the item name is the export filename stem. New collections use the collection name and an unpadded number, e.g. JENCHA Demo Collection #1, while the file is JENCHA Demo Collection-00001.png. Project name is a separate internal title. User-entered names and values are never translated.
The compact preview changes presentation, not the metadata schema. A group with multiple active traits blocks JSON export. Duplicate flat field names, including case/whitespace variants of reserved names, also block export. Rename the conflicting detail/group, hide extra variants, or export PNG only.
Existing export folders are never overwritten. Choose another destination or rename/move your previous export before repeating. PNG-only keeps its ordinary filename picker and replacement confirmation; it does not update or remove earlier metadata. Single Item has no automatic numbering. Collections use chapter 17. Nothing is uploaded, inscribed or published by this export.
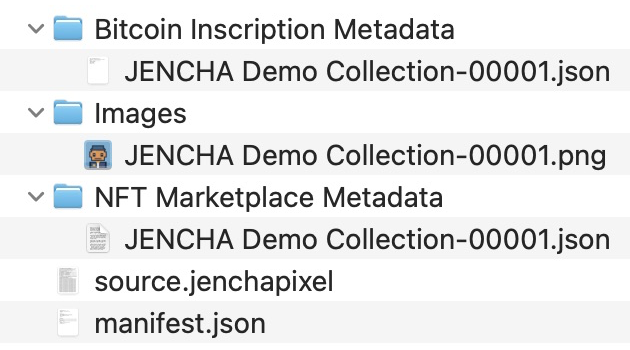
The folder screenshot shows a collection item, so it uses five-digit numbering. Single Item uses the unnumbered project filename stem, as shown in the folder example above.
Back to top15 / GUIDE
Keyboard shortcuts
Tool and canvas shortcuts apply when the canvas has focus. While editing a layer name, keys perform normal text editing. Choose a tool on the left to return to the canvas when necessary.
| Key | Action |
|---|---|
| B / E / G / I | Pencil / Eraser / Fill / Eyedropper |
| V / L / U / M | Move / Line / Shape / Selection |
| ⌘N / ⌘O / ⌘S | New project / open project / save |
| ⌘Z / ⇧⌘Z | Undo / redo |
| ⌘A | Select the entire canvas |
| ⌘C / ⌘X / ⌘V | Copy / cut / paste selection |
| ⌘D | Deselect |
| Delete | Erase selected pixels |
| Esc | Cancel a pending preview; otherwise deselect |
| + or = / − | Zoom in / out, without Command |
| 0 | Fit canvas |
| Space + drag | Pan the view |
| ⌥ + click | Temporarily sample a color |
| Arrow / Shift + arrow, with V active | Move pixels by 1 / 10 pixels |
| Shift + drag, with U active | Draw a square / circle |
| ⇧⌘H | Show Home |
Free, Pro and collection controls
Free: complete editing, saving, Single Item PNG + both optional JSON formats, collection setup and up to 100 temporary local preview items. Pro: permanent Create / Add / Resume / Extend, as many collections as you want, up to 10,000 items per collection.
- Preview Collection: configure the full target, roles and distribution, then inspect up to 100 temporary examples. No destination folder or exported files.
- Regenerate Preview: replace the temporary sample. Back to Settings: adjust the same setup while the configuration stays open. Closing removes the preview.
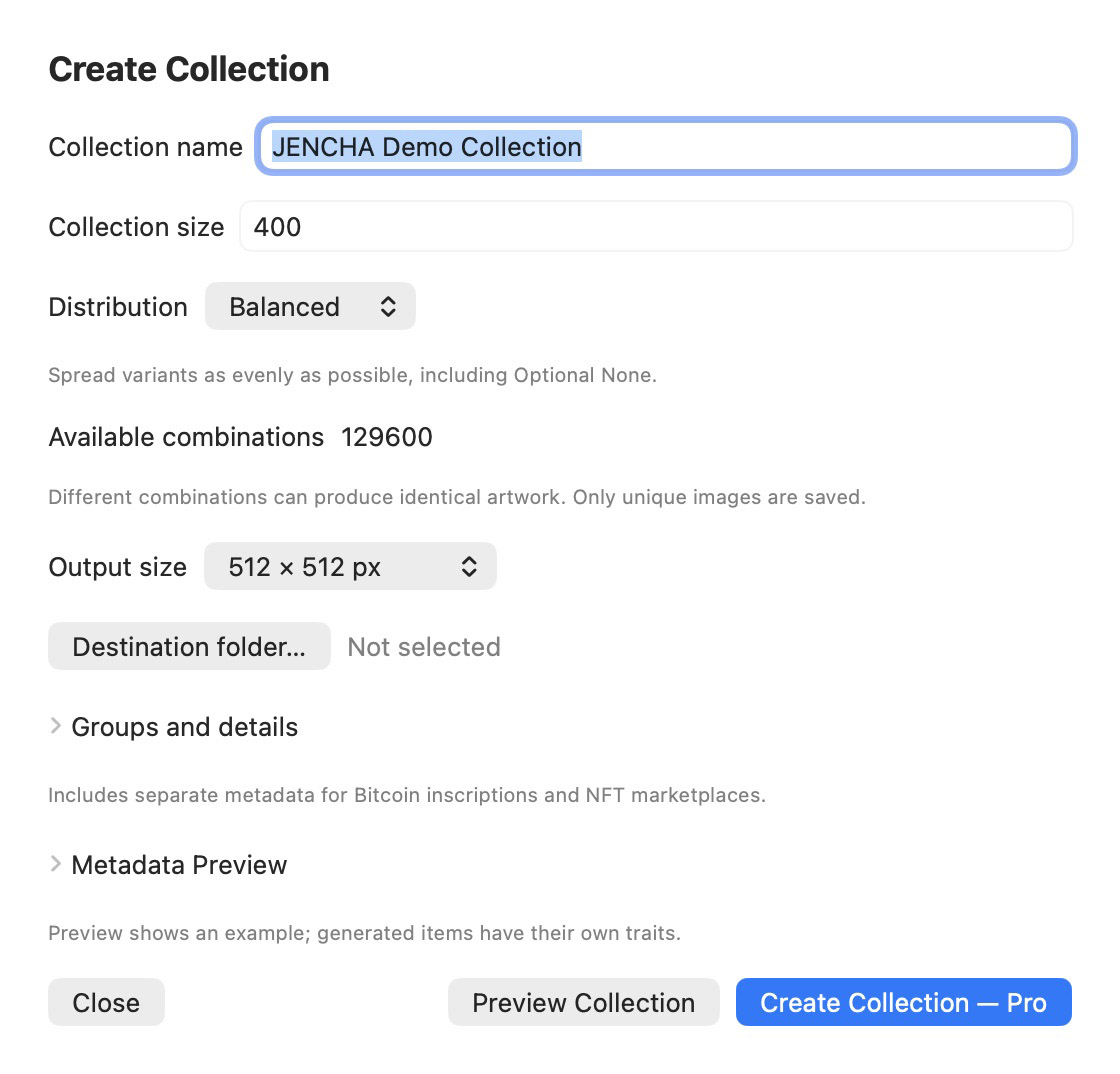
- Create Collection — Pro: open the Pro offer in Free. Purchase does not start production. After activation, choose a destination and deliberately click Create.
Pro workflows: Create = new collection; Add = one hand-picked item; Resume = finish the saved target; Extend = raise a completed collection to a new total. 50 100 adds 50. Resume and Extend are on the first Export screen; keep the whole collection folder.
Application menu: JENCHA Pixel Pro… · Restore Purchases · Manage Subscription…. Restore checks your Apple purchases; Manage opens Mac App Store subscriptions.
Back to top16 / GUIDE
Troubleshooting
| What happens | What to check |
|---|---|
| I can only draw inside a small area | A selection may still be active. Press ⌘D. |
| Drawing appears to do nothing | Check the active layer, layer and group eyes, and tool/layer opacity. A higher layer may cover your drawing. |
| Fill crosses my outline | The outline needs to be on the layer being filled. Fill does not read other layers. |
| An imported PNG is invisible | Check whether its inherited group is hidden. |
| A copied area seems not to paste | It may be directly over the original. Drag inside the selection. |
| Paste from another application fails | Save a PNG there and use Import PNG… with matching dimensions. |
| My PNG has a white background | Check for white pixels on a visible layer. Some viewers also display transparent pixels on white. |
| Export is blocked | Read the message: reduce the scale or resolve the listed metadata conflict. |
| Add layer is unavailable | The layer count or memory limit for this canvas may have been reached. |
| Options are missing in a small window | Scroll the tool options horizontally or widen the window. |
| Pixels disappeared after rotating or moving | Pixels beyond the canvas can be cropped. Use ⌘Z immediately. |
| I want to leave full screen | Move to the top edge and use the green window control. Esc is not a guaranteed full-screen exit shortcut in this app. |
| I expected editing or Single Item to require Pro | They are Free, including both optional JSON formats. Pro is required for permanent collection production. |
| Preview shows fewer items than my target | Preview is limited to 100 temporary unique examples, or fewer for a smaller target or duplicate-heavy artwork. Set the full target first; planned counts apply to that target. |
| My preview has disappeared | Closing removes the temporary examples. Regenerate replaces them. A preview is not a saved collection and cannot be resumed. |
| The subscription is unavailable or a purchase is pending | You can keep using Free. Retry a failed check, use Restore Purchases for an existing subscription, or wait for Apple to confirm a pending purchase. See subscription help below. |
If a problem persists, save a copy of the project if possible. Note what you did, the canvas size, your macOS version and any error message. Include a screenshot without private information when reporting the issue.
Layers, metadata and collections
| Merge is unavailable | Select at least two adjacent, visible, unlocked layers in one group. Merge conditions |
| Move picks another layer | It picks the topmost eligible pixel. An active pixel selection takes priority. Move |
| Project Details will not save | Project name is required. Website needs a full http(s) address. Resolve conflicting detail/trait names. Project Details |
| JSON export is blocked | Use one active variant per included group and distinct field names. Name, Collection, Description and Website are reserved, ignoring case and surrounding spaces. Metadata rules |
| The export folder already exists | Choose another destination or move/rename the previous export. Existing export folders are never overwritten. |
| Resume will not continue | Use the complete collection folder and matching source.jenchapixel. A finished collection needs Extend; curated-only collections use Add. Resume |
| Extend rejects the new total | Enter a total above the current count, within the limit and with enough distinct images. 50 100 means 50 extra. Extend |
| A collection item is a duplicate | Another combination can still produce the same image. Add blocks it; generation skips it. Duplicate checks |
| Output is missing or changed | Keep the whole folder intact and restore a complete backup. Do not invent replacement records. Collection recovery |
| An older collection has different folders or names | Older collections retain their original output and numbering. Start a new collection for both current formats and five-digit filenames. Naming and compatibility |
17 / GUIDE
Collection Builder — build a collection
A collection is a set of related artworks, such as six robot portraits with different backgrounds and eyes. One portrait is an item. You do not need NFT, blockchain or programming knowledge. JENCHA Pixel creates ordinary image files and descriptions on your Mac; it does not publish, sell or mint them.
There are two ways to work: choose each portrait yourself with Add to Collection, or let Create Collection combine the alternatives you prepared. Save your editable project before starting.
The new distribution screenshots use the real JENCHA Demo project: seven groups and 38 layers. The completed Balanced example has 220,500 available combinations. The six-item lesson below is a separate, smaller practice project. Other screenshots illustrate their own settings, as explained in the captions. Names you enter, such as Background and Creator, are not translated.
Free, Pro and a collection preview
Free is a complete pixel editor. Draw, organize layers and groups, make selections, use Quick Shades, save and reopen projects, import PNGs and use Single Item to export PNG plus both optional metadata formats. Project Details, traits, Required / Optional / Fixed and Balanced / Random / Weighted are also Free.
Pro is for permanent collection production: Create, Add to Collection, Resume and Extend. Create as many collections as you want, with up to 10,000 items per collection. Pro includes bulk artwork and metadata, automatic numbering and duplicate checks across the collection.
JENCHA Pixel Pro Monthly is a monthly subscription through Apple. The app shows the current price for your App Store region before purchase. It renews automatically every month until canceled. Canceling keeps Pro active until the paid period ends. Then Free remains fully editable and existing exports stay yours: nothing is deleted, locked or watermarked.
Try a local Collection Preview
- Open Export… Create Collection.
- Choose the name, full target size, roles and distribution. A destination is not needed to preview.
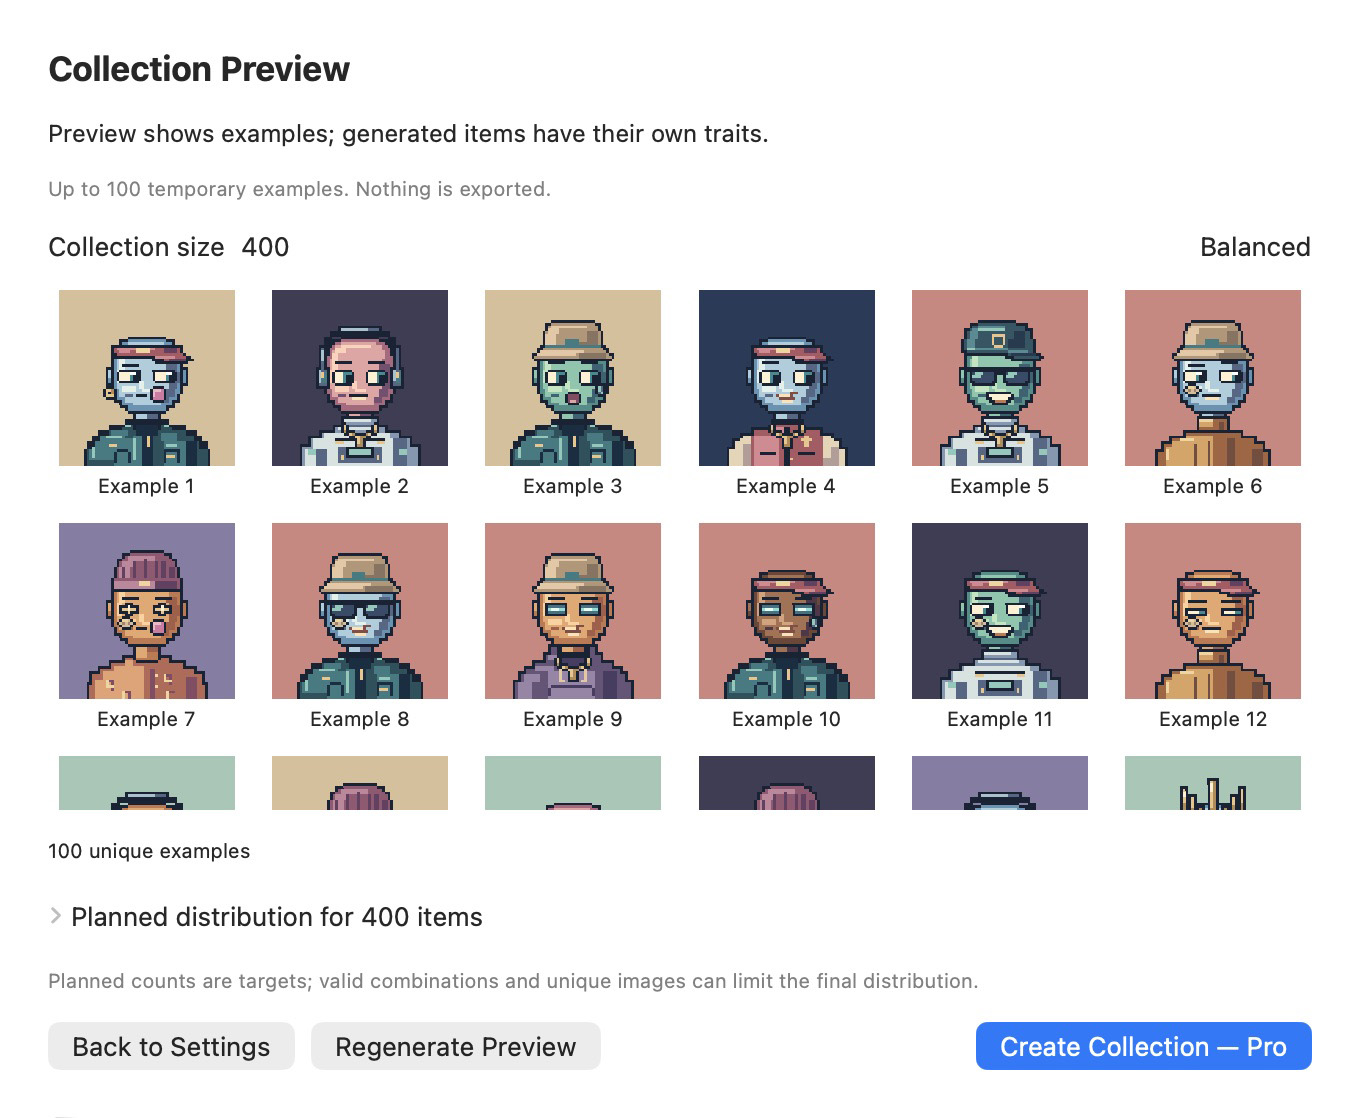
- Click Preview Collection. It makes up to 100 temporary unique examples locally; a smaller target makes fewer. It creates no PNGs, JSON files, manifest or permanent collection state.
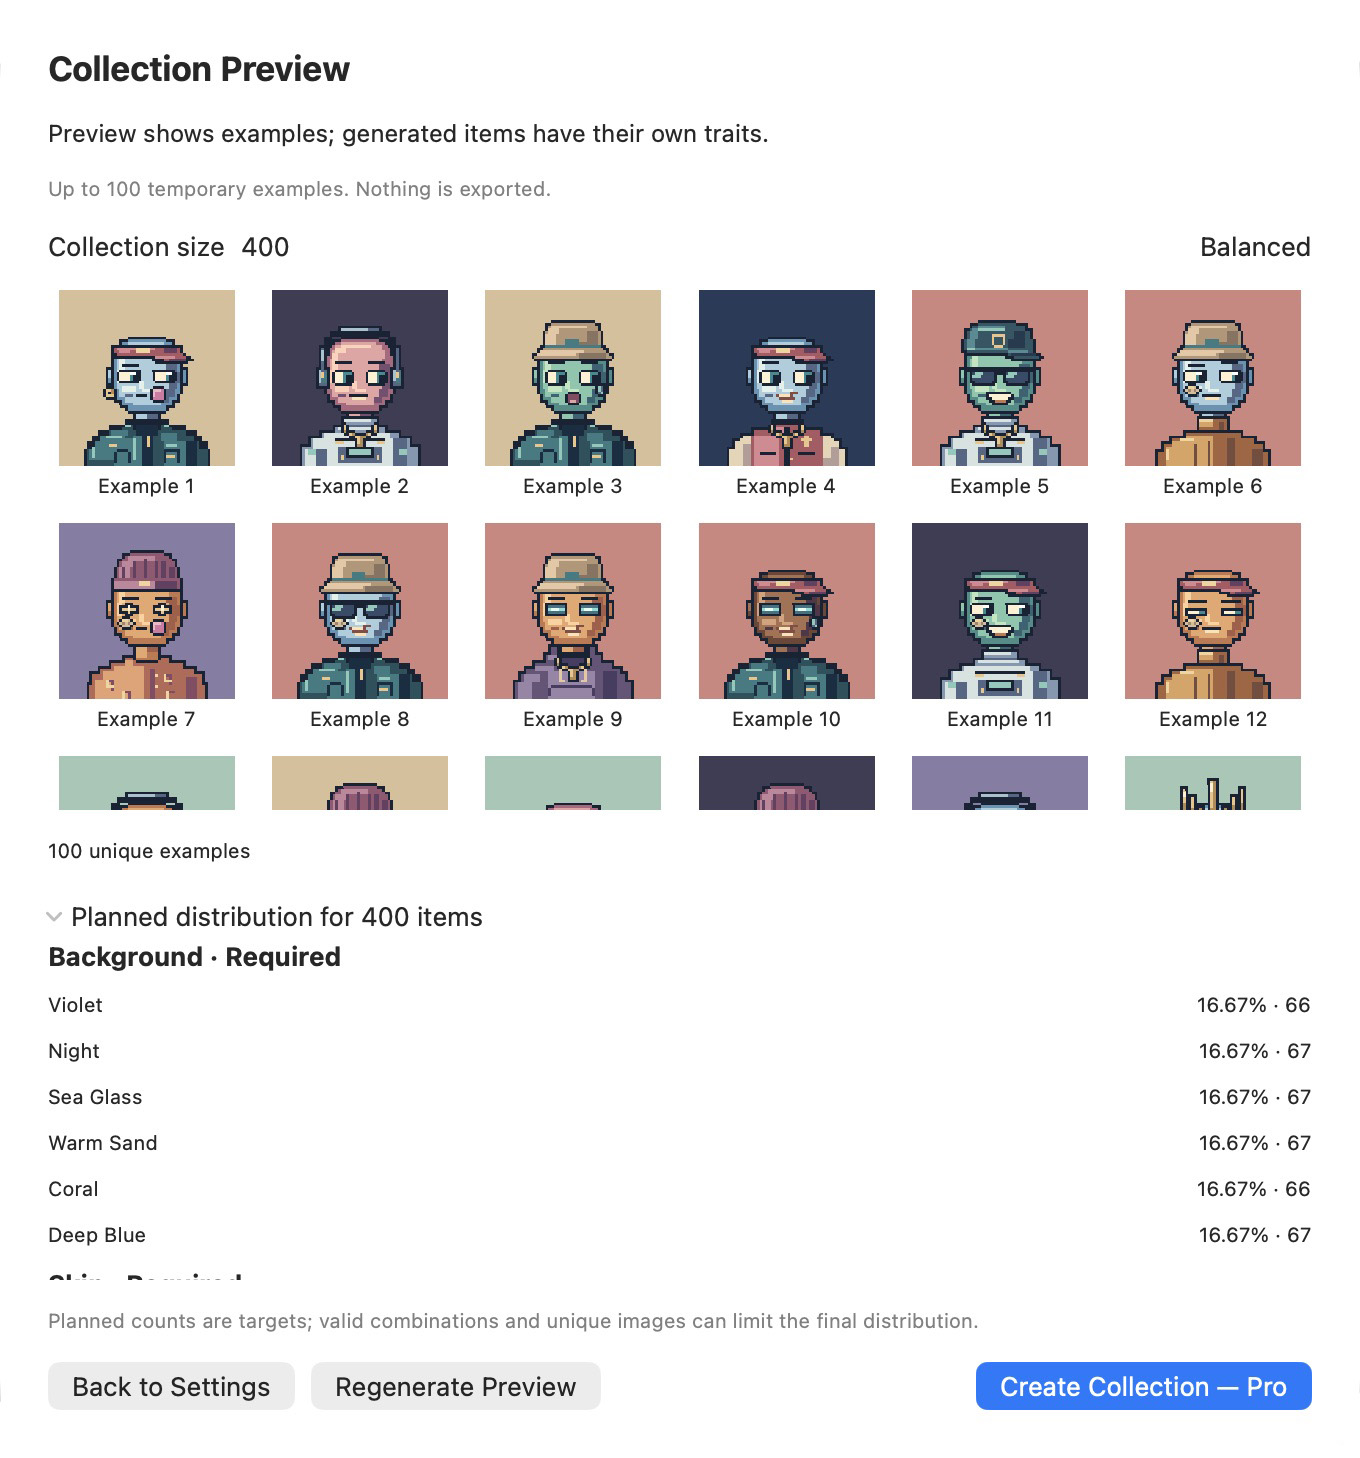
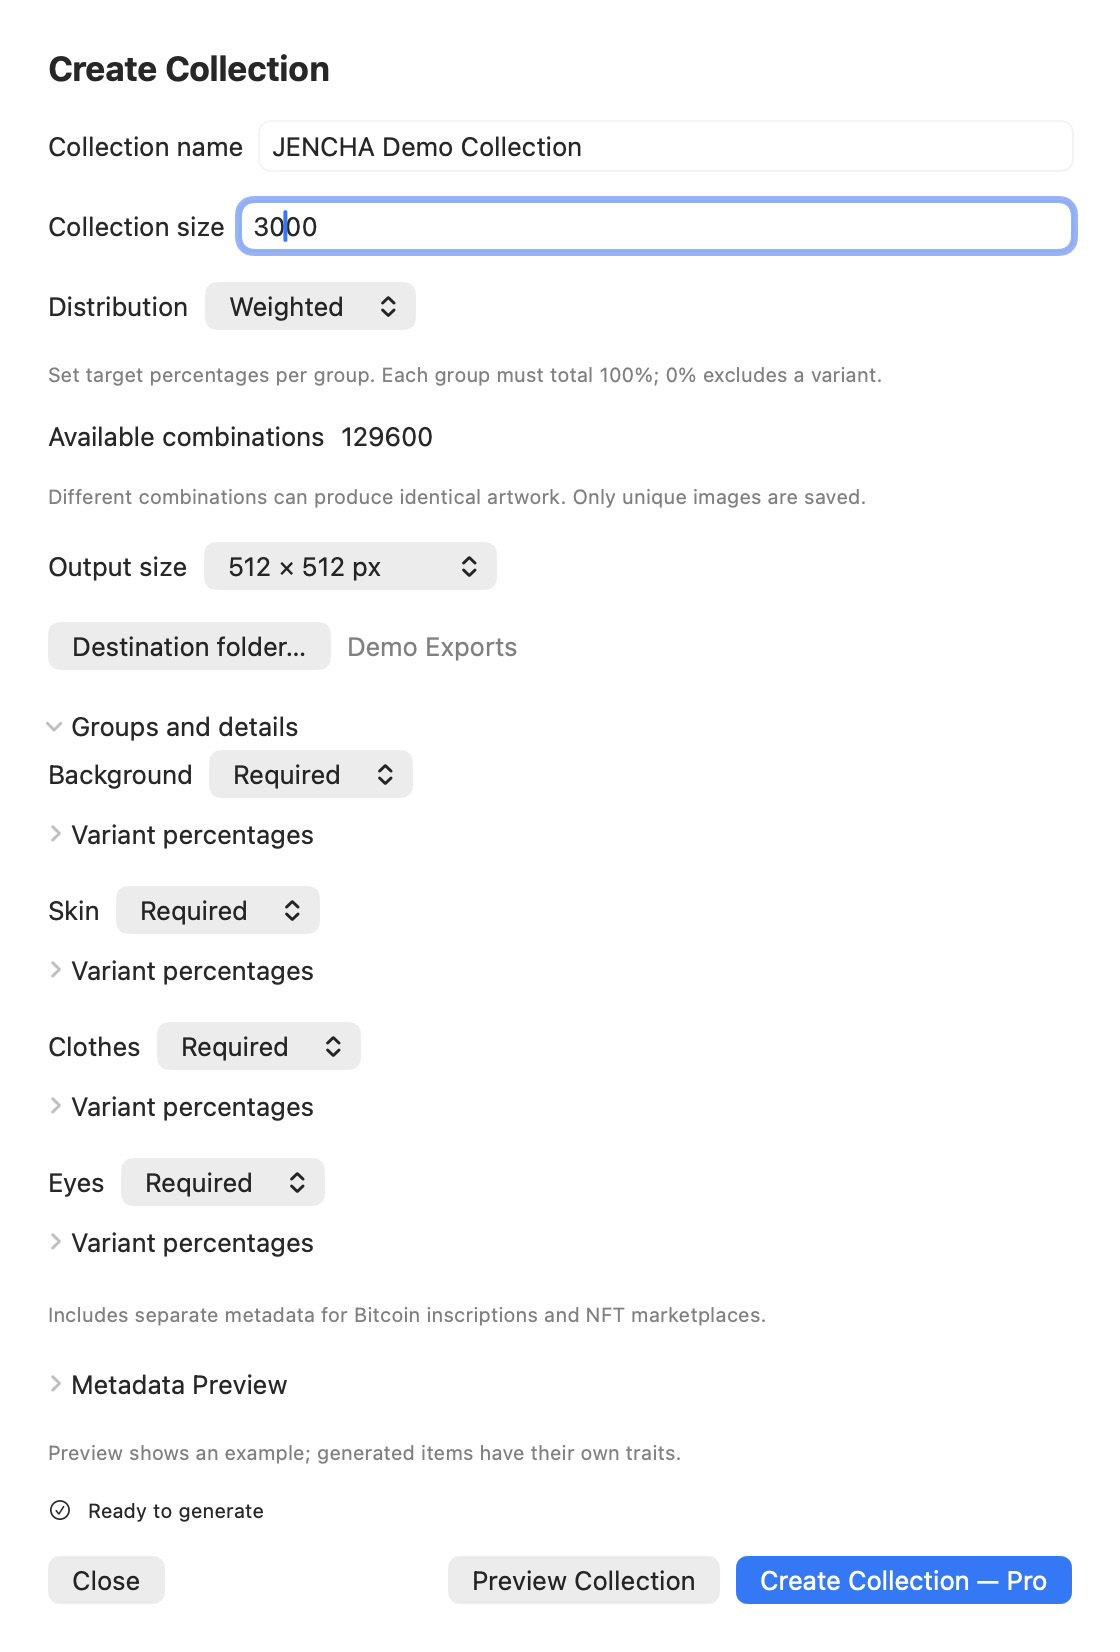
- For Balanced or Weighted, open Planned distribution for … items. Counts refer to the full target: 10% of 3,000 plans 300 items, even though only up to 100 examples are shown. Planned counts are targets, not guaranteed rarity. Random shows Sample distribution and does not guarantee exact percentages.
- Use Regenerate Preview for another sample, or Back to Settings to adjust the same setup. Regenerate replaces the old examples. Back keeps your settings while the configuration screen stays open. Closing removes the temporary preview. Duplicate-heavy artwork may produce fewer examples, with an explanation.
- Create Collection — Pro opens the subscription offer in Free. Buying never starts generation. After Pro activates, return to the setup, choose a destination, check it and deliberately click Create.
Preview is available in Free and Pro. It is a sample for checking artwork and the mix, not a saved collection or a bulk export. The sample does not guarantee the exact final items or mix. You cannot use Add, Resume or Extend on a preview. Required / Optional / Fixed and the distribution rules below still apply. No JENCHA account or cloud is involved.
Pro access, restore and management
Find JENCHA Pixel Pro…, Restore Purchases and Manage Subscription… in the application menu. Restore checks purchases through Apple using your Apple Account. No active subscription found? Free remains available. A pending purchase unlocks only after Apple confirms it. If a check fails, choose Retry or Restore Purchases; you can keep using Free.
Manage Subscription opens Mac App Store subscriptions. An already authorized generation can finish safely when Pro ends; starting a new Create, Add, Resume or Extend action requires active Pro. Buying or restoring never starts production automatically. Your artwork stays local on your Mac. Privacy and Terms remain accessible without subscribing.
See the Pro window
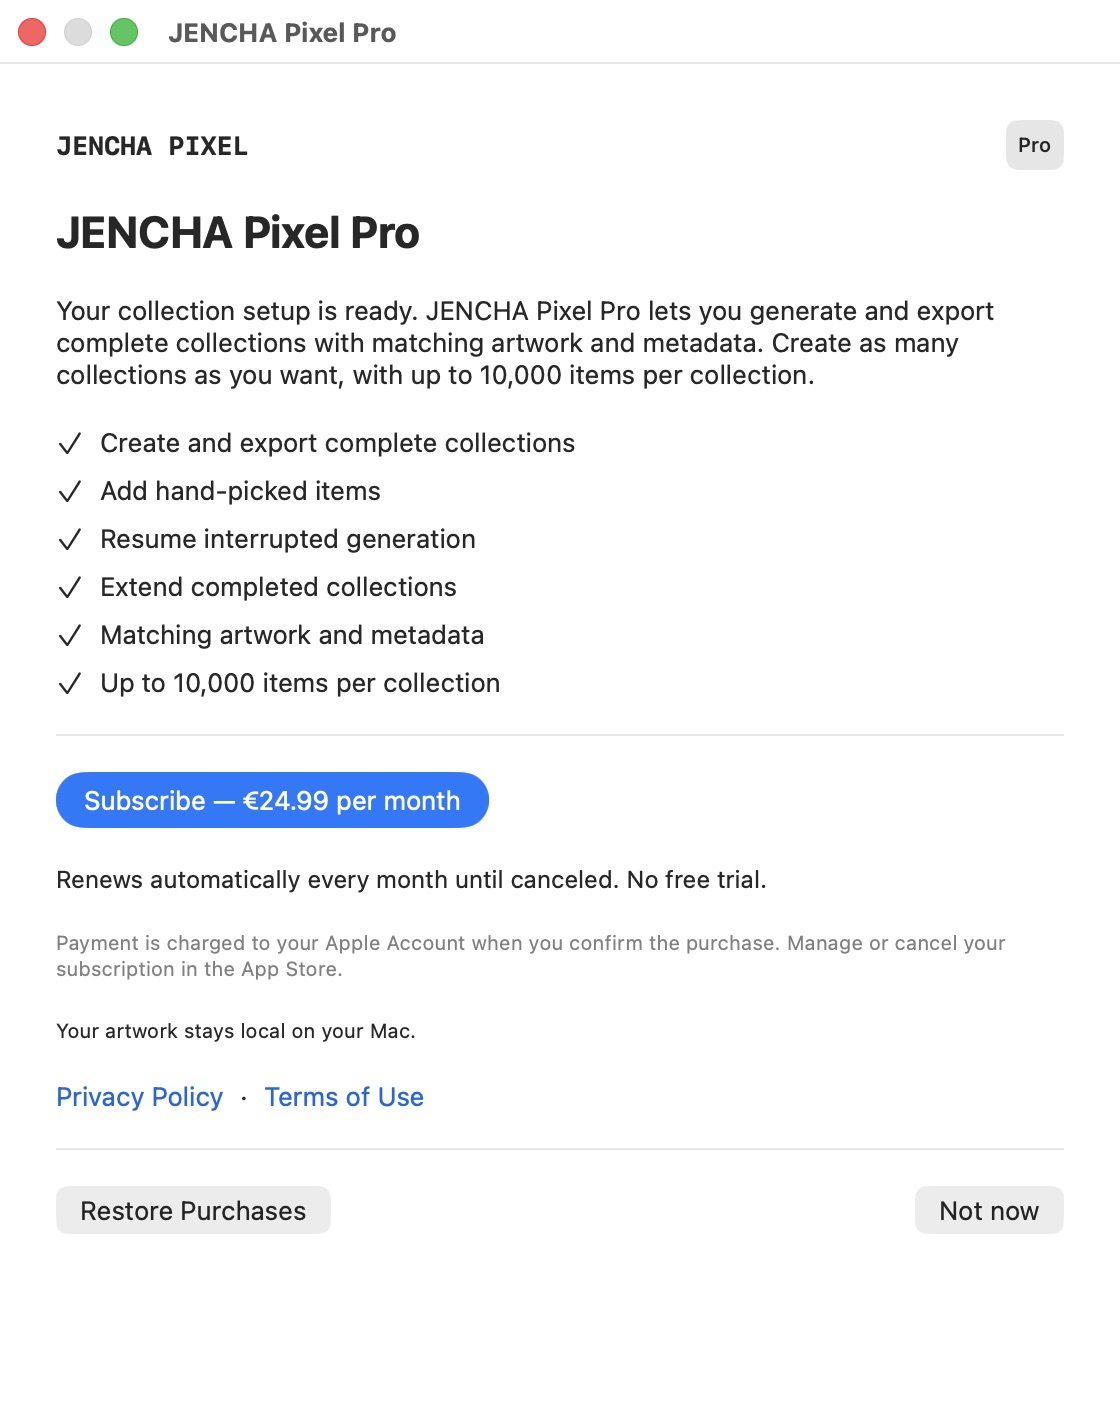
Purchase and subscription help
Understand the building blocks
| Word | Meaning and example |
|---|---|
| Layer | One transparent sheet of artwork, such as a blue background or a pair of eyes. |
| Trait | A characteristic of an item. For example, its Background is Blue or its Eyes are Laser. |
| Trait group | A folder of alternatives for one characteristic. A Background group can contain Blue, Red and Green layers. |
| Variant | One alternative in a group: Blue is one background variant. |
| Combination | The choices put together for one item: Blue background + Normal eyes. |
| PNG | The actual picture you can view, share or place on a website. It can retain transparency. |
| Metadata | A short written description of an item, such as its name and chosen background/eyes. It is separate from the picture. |
| JSON | The text-file format used to save those descriptions so other software can read them. You do not have to write JSON yourself. |
| Collection state | The app's saved record of what has already been created and where it should continue. It survives closing the app. |
Put each variant on its own layer at the intended canvas position. Group related alternatives together. The normal layer order and opacity determine which pixels appear on top. Use a small practice project first.
Why three backgrounds and two eye choices make six items
Create these two groups:
| Background | Eyes |
|---|---|
| Blue | Normal |
| Red | Laser |
| Green |
Set both to Required. Each background can pair with either eye choice: Blue/Normal, Blue/Laser, Red/Normal, Red/Laser, Green/Normal and Green/Laser. That is 3 × 2 = 6 available combinations. The app calculates this for you.
250 layers does not automatically mean 10,000 items. A single Required group containing 250 variants provides 250 choices. Dividing alternatives among several groups can provide many more combinations. Fixed contents provide no extra choices. Different combinations can also produce the same picture, for example if an upper layer covers the differing eyes. Only unique final images are saved.
Choose the right export workflow
Setup and Preview are Free. Permanent Create, Add, Resume and Extend require active Pro. In Free, Add, Resume and Extend show their Pro offer before a collection folder is chosen.
- Single Item: export the currently visible artwork once. PNG-only lets you choose the filename; JSON uses the saved project filename stem, or Project name / Artwork for an unsaved project. See chapters 12–14.
- Add to Collection: you choose the visible layers for each item. The app adds numbering, PNG/JSON output and duplicate checks.
- Create Collection: start a new generated collection.
- Resume Collection: finish an interrupted generation to its saved target.
- Extend Collection: increase a completed generated collection to a new total. For example, 50 100 generates 50 additional items. Both actions are on the first Export screen and ask you to choose a collection folder; the app cannot know which folder you want in advance.
New collection workflows always save one PNG and two matching JSON files in separate folders. For example, JENCHA Demo Collection-00001.png is the picture and JENCHA Demo Collection-00001.json describes that same item. You do not need to manage the matching numbers yourself. If you want only one PNG without JSON, use Single Item.

Every control in Create Collection
| Control | What it does, when to use it, and a good first choice |
|---|---|
| Collection name | Names the new subfolder, its saved collection record and the numbered output files. Initially suggested from Project Details > Collection name; changing this export field does not change the saved details. Start with a simple name such as JENCHA Demo Collection. The app does not offer renaming after creation; choose a new collection for a different name. Avoid filename extensions and path characters such as /, \ or :. |
| Collection size | How many unique items you want, from 1 to 10,000. Enter digits, for example 6. Start small. This is a target, not a promise that covered or identical variants can produce that many different pictures. |
| Available combinations | The possible choices from your groups and roles. The app computes it automatically. A request above this number is blocked. For the example, choose six or fewer. The number is an upper bound; visual duplicates can make the final count lower. |
| Distribution | Choose Balanced (recommended), Random or Weighted. This controls the collection mix, separately from group roles. |
| Variant percentages / Total | Visible within Groups and details for Weighted. Give each variable group a 100% total; Optional includes None. Start with the equal defaults and adjust only where you want a deliberate mix. |
| Output size | The dimensions of each saved PNG. It does not change the source canvas. For 64 × 64 artwork, 512 × 512 is 8× and 1024 × 1024 is 16×. Each source pixel becomes a sharp square block, without blurry interpolation. Start with 512 × 512 for this example, or the original size if that is what you need. |
| Destination folder… | Choose a parent folder for a new collection. The app creates a new subfolder using Collection name and puts the whole collection package there. For example, choose Documents and name JENCHA Demo Collection to create Documents/JENCHA Demo Collection. Use a location you can find and back up. The new subfolder must not already exist. |
| Groups and details | Expand this section to see the role picker for every group and short explanations. Review these before your first generation. It can stay collapsed while you work once the choices are correct. |
| Required / Optional / Fixed | Set the meaning of each group, as explained below. For the six-item example, choose Required for Background and Eyes, and Fixed for an unchanging visible base. |
| Ready to generate / warning text | A short check before starting. A missing destination keeps Create disabled. Resolve a displayed warning, such as an excessive item count or conflicting metadata, before continuing. This check cannot predict every later disk/storage problem. |
| Create | With active Pro, begin the new collection once required settings are valid. The app saves a copy of the source project and the chosen settings. |
| Close | Leave this export screen. It does not delete a saved collection. During generation, use Cancel first. |
| Preview Collection | Free: up to 100 temporary local examples, without a destination or permanent output. |
| Regenerate Preview | Replace the temporary preview with another sample. |
| Back to Settings | Return to the same settings while the configuration stays open. |
| Create Collection — Pro | In Free, open the subscription offer. Buying does not start generation; return to the setup and choose Create with active Pro. |
New collection? Choose Destination folder.
Continue an unfinished collection? Export Resume Collection.
Make a completed collection larger? Export Extend Collection.
Do not create a new destination to resume. The saved folder is what tells the app which numbers and combinations have already been used.
Required, Optional and Fixed: what really happens
| Role | Result in the picture | Effect on combinations | Effect on item metadata |
|---|---|---|---|
| Required | Exactly one usable variant from the group is chosen for each item. Background with three colors means every item gets one background. | Three variants give three choices. | If Include in metadata is on, the selected layer supplies the value, e.g. Background: Blue. |
| Optional | One usable variant, or none. Headgear with Cap and Helmet can also produce a character without headgear. “None” is added automatically; no empty layer is needed. | Two variants plus none give three choices. | When none is chosen, this group contributes no trait. Otherwise the selected layer contributes if metadata is enabled. |
| Fixed | The group's saved visibility and visible layer stack stay unchanged in every item. Make a base/outline visible before creating the collection if it must appear everywhere. Hidden fixed contents remain hidden; Fixed does not automatically show them. | One unchanging choice; it does not multiply the number of combinations. | Include in metadata is still independent. One active layer can supply a trait; several active layers in an included group cause a conflict. |
A Fixed group is not varied. Required and Optional groups follow the separately chosen Distribution setting described below.
Hidden alternatives inside Required/Optional groups are included as candidates, even if that group is hidden in the editor. Empty layers and layers with no effective opacity are excluded. Ungrouped layers retain their saved visibility as fixed content. Export does not change the editor's visibility.
Include in metadata is in the group's menu in the editor (chapter 13). It controls the written properties, not whether artwork appears. At first, included groups default to Required and other groups to Fixed. Review these defaults. For a Fixed base with several visible layers, turn Include in metadata off to avoid a conflict. Group, layer and trait names stay exactly as you entered them.
Distribution: Balanced, Random or Weighted
Group roles and distribution answer different questions. Required / Optional / Fixed decide what can appear in one item. Distribution decides how choices are spread across the collection. Fixed groups have no variant-percentage controls.
| Distribution | What it means | When to choose it |
|---|---|---|
| Balanced (default) | Tries to use each available choice in every variable group as evenly as possible. Optional None counts as a normal choice. | Recommended for your first collection or a varied sample of a large project. Six backgrounds across 400 items means about 66 or 67 of each, rather than 400 of the first background. |
| Random | Chooses unique combinations across the entire available range. Counts can differ by chance; it does not promise equal use or a percentage target. | When you want chance to determine the mix. It does not simply start at a different point in the old sequential order. |
| Weighted | You enter target percentages for each variable group. The app plans item counts to approach those percentages across the whole collection. | When you want a deliberate mix, for example 40% Blue and 5% Gold. |
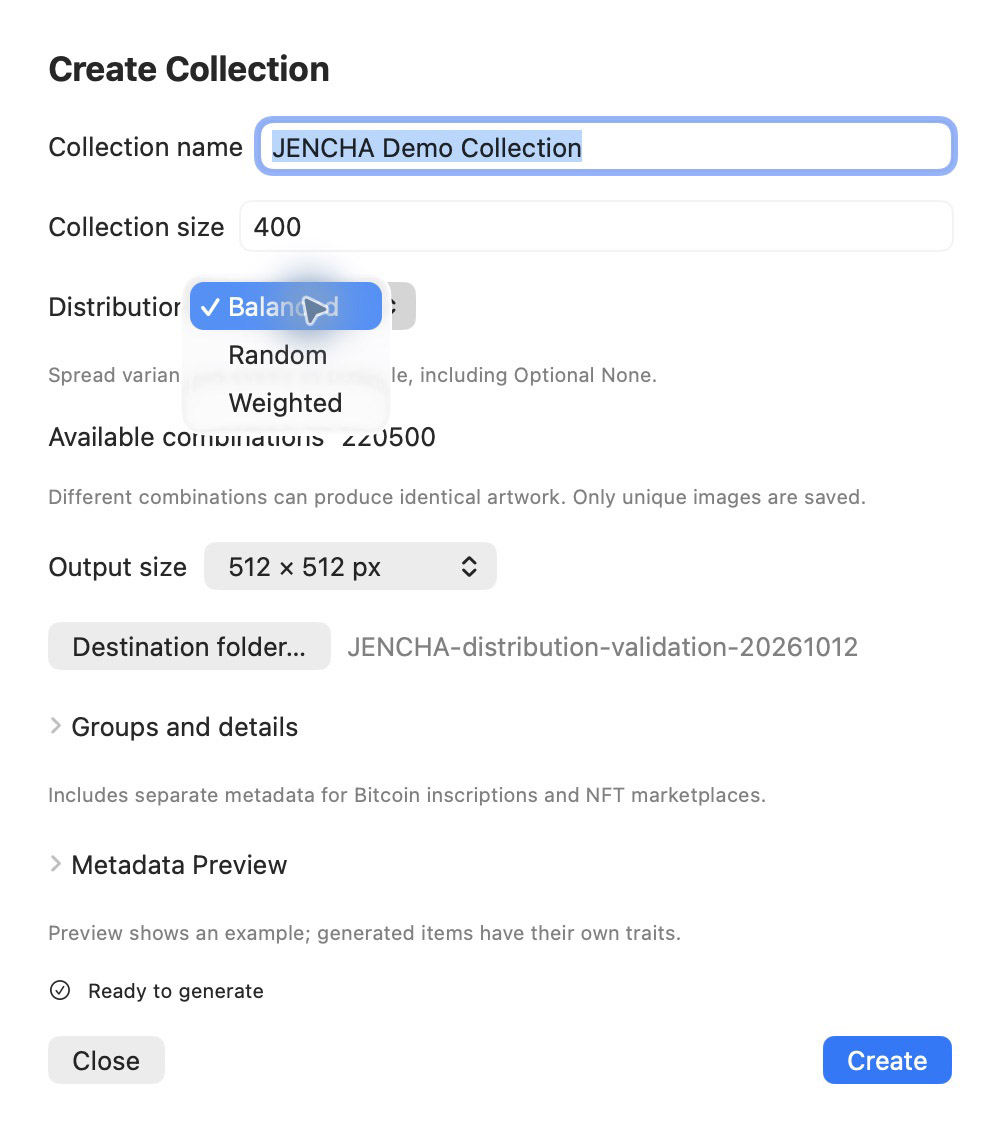
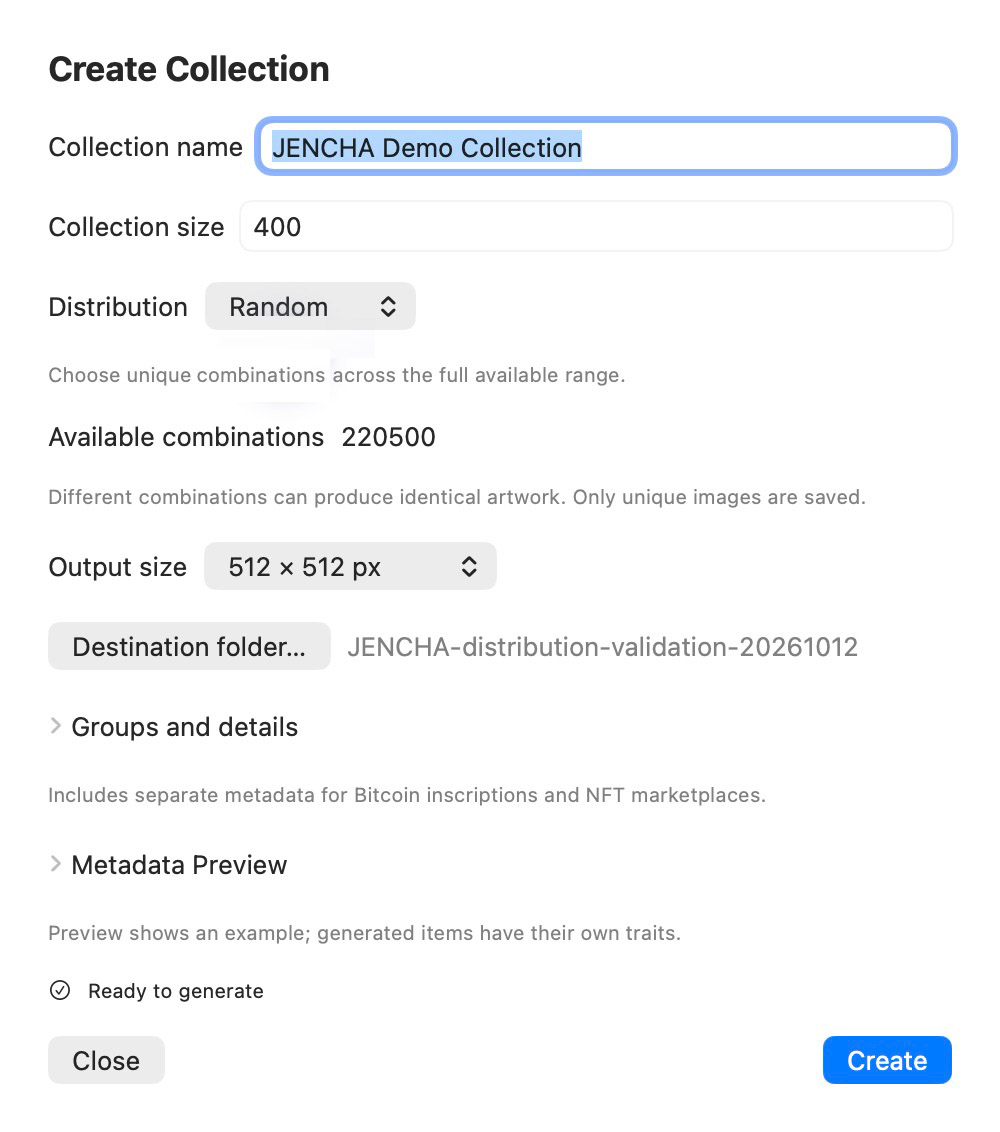
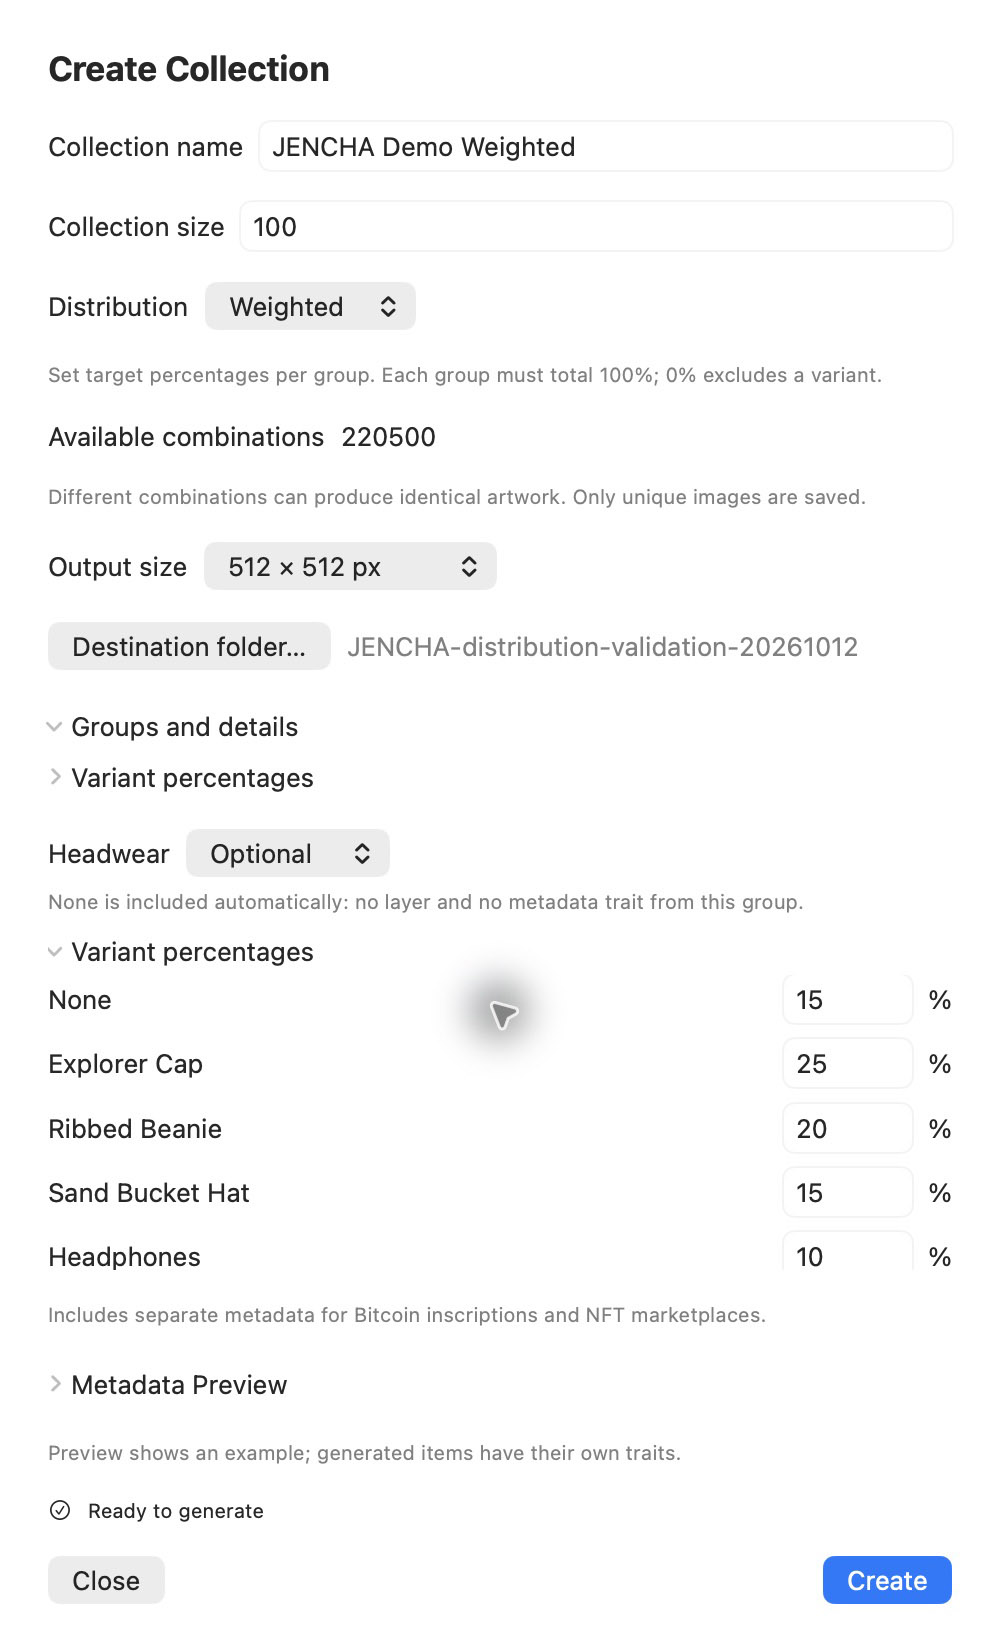
None means no variant from this group. JENCHA Pixel adds this choice automatically for Optional groups. You do not create an empty layer or a transparent image. The group's variable artwork is absent in that item; other visible artwork remains. With four headwear variants plus None, Balanced aims for 100 of each choice in a 500-item collection.
When None is chosen, the group contributes no trait in either Bitcoin Inscription Metadata or NFT Marketplace Metadata. The app does not write a trait whose value is “None”. Include in metadata still applies to real selected variants.


Set Weighted percentages
- Select Weighted under Distribution. Groups and details opens.
- For each Required or Optional group, open Variant percentages.
- Enter each variant's percentage. Optional groups also show None.
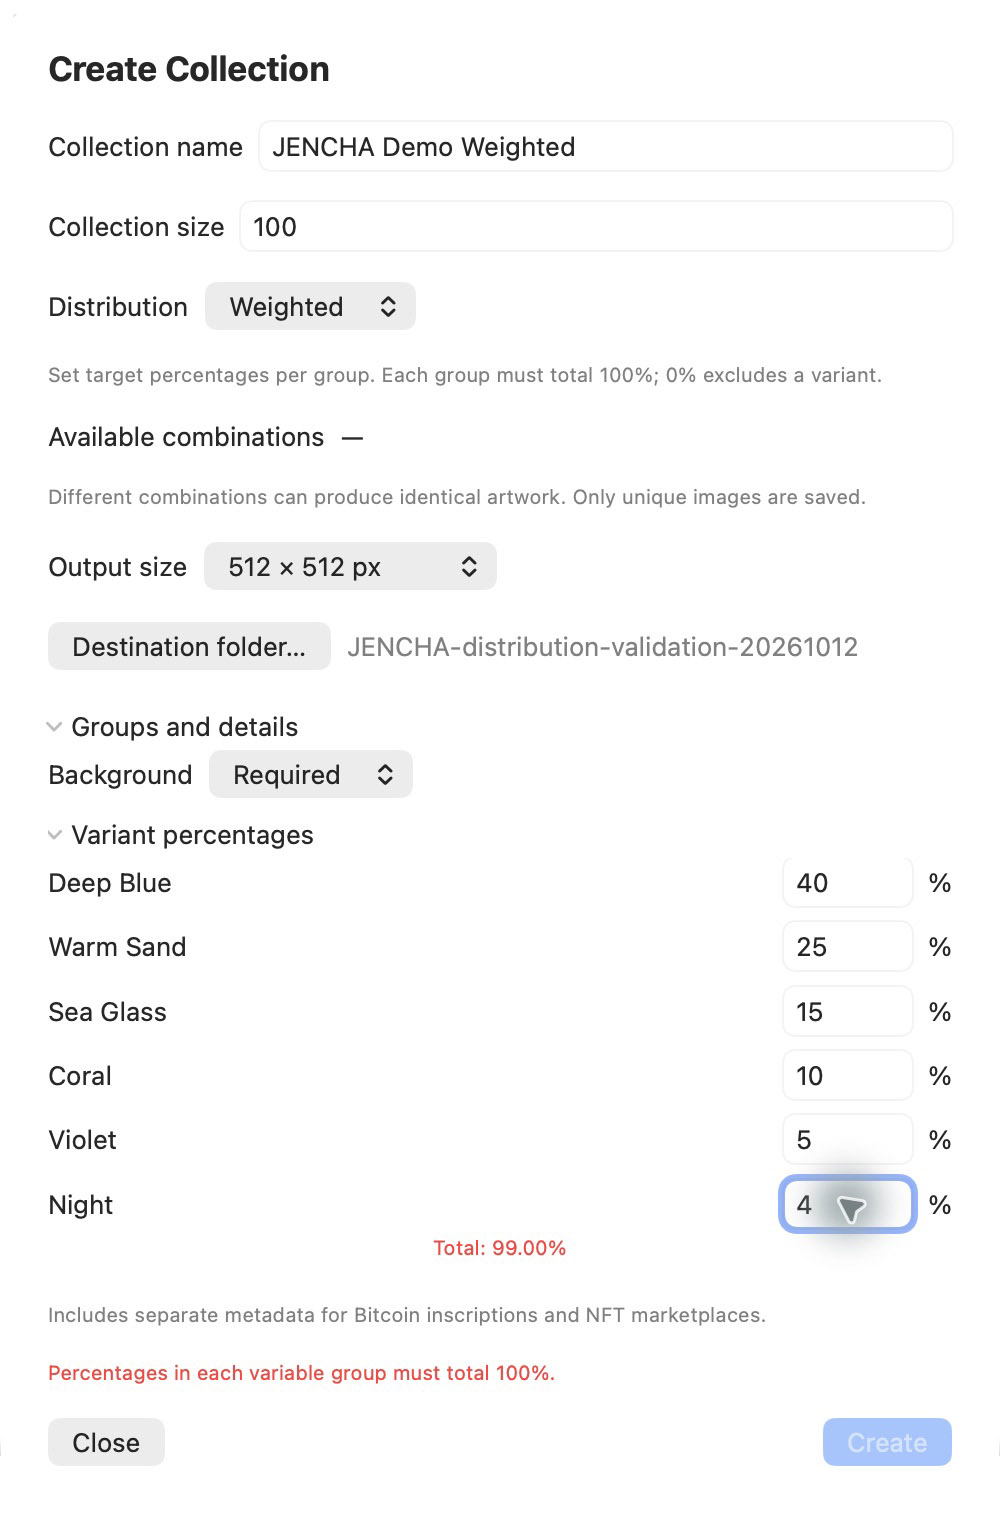
- Check Total: 100.00% for every variable group. Create stays disabled while any group is invalid.
The initial percentages divide 100% equally, with small rounding differences if needed. You can enter up to two decimal places, using a dot or comma, for example 12.50 or 12,50. Percentages must be between 0 and 100 and add to exactly 100 per group. 0% excludes that choice from Weighted generation and from Available combinations. All-zero groups are invalid. Optional may keep only None at 100%, which supplies one choice and no trait.
For six backgrounds, 40 / 25 / 15 / 10 / 5 / 5% targets 160 / 100 / 60 / 40 / 20 / 20 items in a 400-item collection. Whole-item rounding is repeatable and does not always give the extra item to the first listed variant. For Headwear, None = 15% targets 60 without headwear in 400 items. Each group has its own total; do not add percentages across different groups.
Unique images take priority over exact percentages. Covered or identical variants can make a perfect mix impossible. The app never saves duplicates merely to hit a target. If no more unique output can be found, it reports the actual saved count or a bounded search stop; it does not claim that an unfinished target is complete. These are target distributions, not a guarantee of exact rarity or supply.
Available combinations uses N choices for Required, N + None for Optional and one saved state for Fixed. Weighted counts only choices above 0%. The number still describes possible combinations, not a guarantee of that many distinct pictures.

A real 400-item example
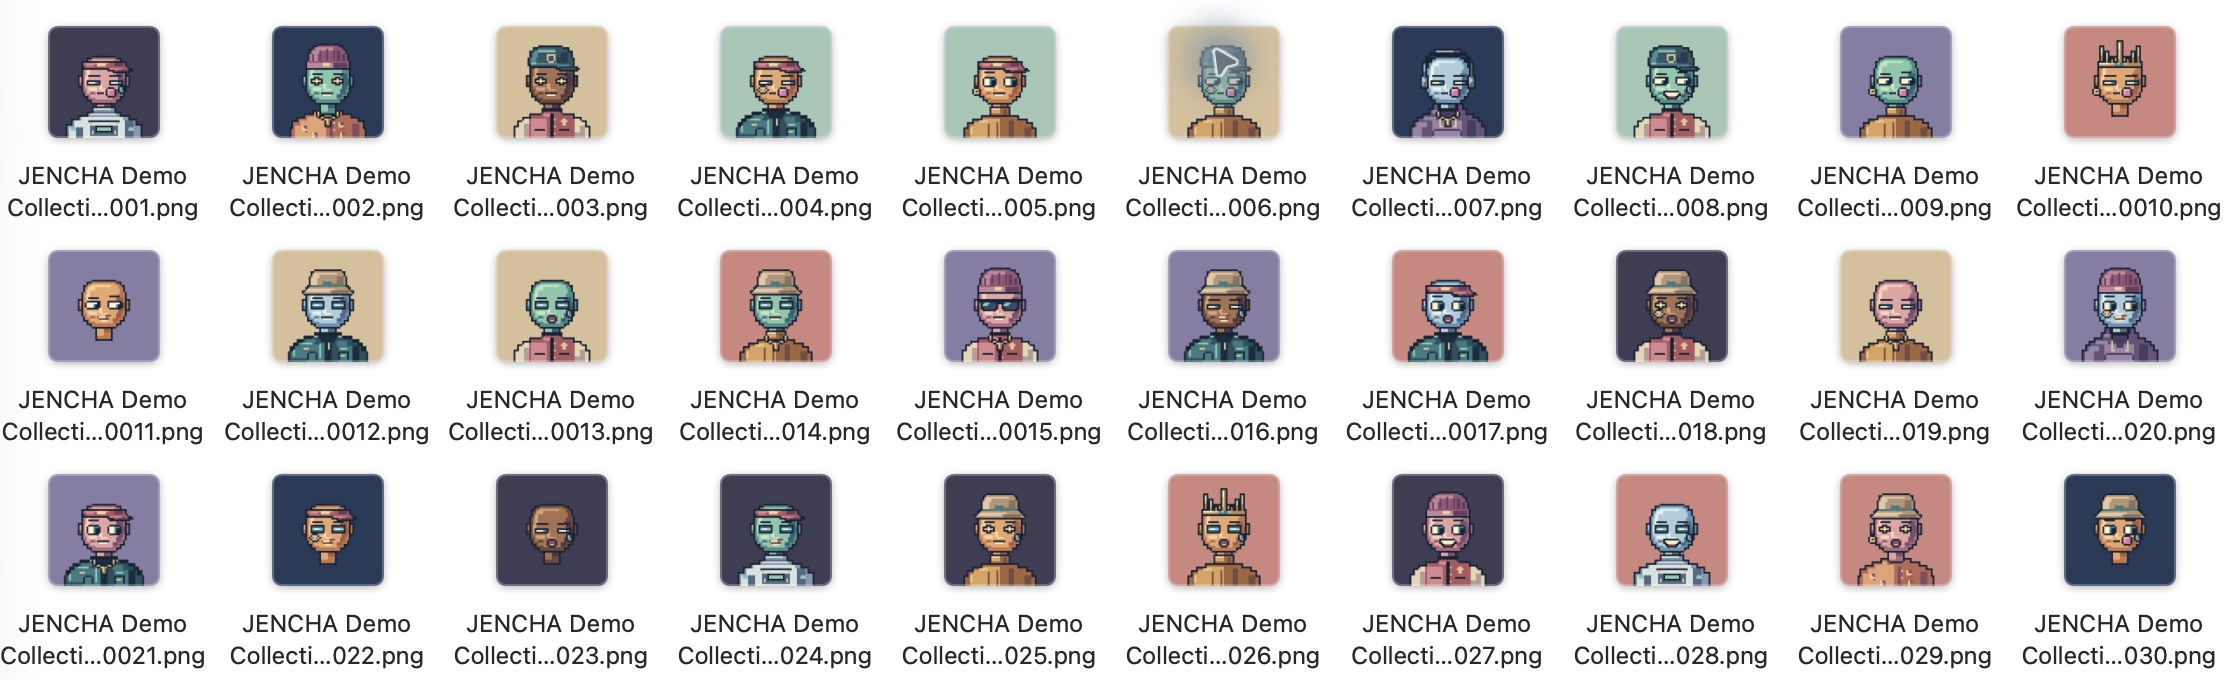
The JENCHA Demo used for the new screenshots contains 7 groups and 38 layers. Background, Skin, Eyes and Mouth are Required; Clothes, Headwear and Accessory are Optional. This gives 6 × 5 × 7 × 6 × 5 × 7 × 5 = 220,500 combinations. Balanced generated 400 unique images: each background appeared 66 or 67 times, each skin 80 times and None appeared 57 times for Headwear. No empty layers were added.

Task: create a new automatically generated collection
Permanent collection production requires active Pro.
- Prepare and save the project. Put Blue, Red and Green in Background; Normal and Laser in Eyes. Make any unchanging base visible.
- Open Export… Create Collection.
- Name it JENCHA Demo Collection and enter 6 for Collection size.
- Keep Distribution: Balanced for your first collection. Open Groups and details. Use Required for Background and Eyes; use Fixed for an unchanging base. Check metadata inclusion in the editor if the app reports a conflict.
- Choose Output size, for example 512 × 512 for a 64 × 64 source.
- Try Preview Collection for a temporary sample. Use Back to Settings to return. If you are in Free, choose Create Collection — Pro and return here after Pro activates; purchasing does not start generation.
- Click Destination folder… and choose where the new JENCHA Demo Collection folder should be created.
- Check Available combinations: 6 and Ready to generate. Use Preview Collection if you only want a temporary sample.
- Click Create. Wait for the completion message and inspect Images/ in the new folder.
While running, Generating collection shows the saved count, target, percentage and a progress bar. If different choices look identical, an “identical images skipped” count appears. Cancel asks the app to stop after the current item; completed items remain saved. It does not delete or roll back the whole collection. There is no separate Pause button.
If not enough unique images can be found, the app stops safely and reports the actual saved count. Completed items remain saved. You can resume, or improve the source and start a new collection; the requested target is not reported as complete when fewer items were made.
Task: resume an unfinished collection
Permanent collection production requires active Pro.
- Open the matching project. If you changed it, open
source.jenchapixelfrom the collection folder. - Choose Export… Resume Collection on the first Export screen.
- Select the whole collection folder containing
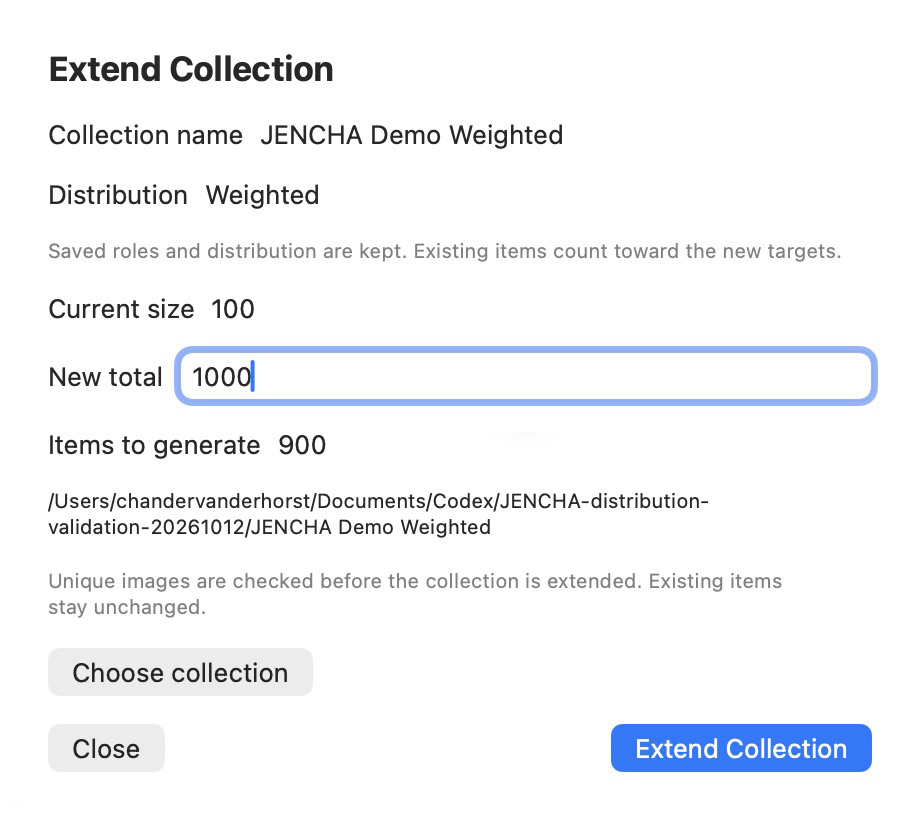
manifest.jsonandsource.jenchapixel, not an output subfolder or individual file. - Check Current items, Target size and Remaining. In the screenshot: 728, 1,000, 272.
- Click Resume. Items 1–728 stay unchanged; generation continues at 729 and finishes the saved target of 1,000.
Choose collection selects another folder; Close leaves the screen. Resume uses the stored source, roles, scale, metadata settings, distribution, percentages and generation state. It takes the existing items into account when completing the saved target. A mismatched project, damaged output or unsupported state blocks continuation. Visibility changes alone are allowed. A completed collection needs Extend Collection. A curated-only collection has no generation target: use Add to Collection.

Task: extend a completed collection
Permanent collection production requires active Pro.
- Open the matching project (or the collection's
source.jenchapixel). - Choose Export… Extend Collection and select the existing whole collection folder.
- Read Current size and enter New total: as shown here, current 100 and new total 1,000.
- Items to generate automatically shows 900. It is not an editable field.
- Click Extend Collection. The app first checks whether enough distinct images remain, then generates additional items.
Existing PNG and JSON files remain byte-for-byte unchanged. Numbering continues at 101, and duplicates are checked against both the original items and the newly generated items. The saved source, groups, rules, scale, distribution, percentages and metadata formats stay the same. Balanced and Weighted count the items already present, including curated additions, and use the new items to approach the targets for the new total. Existing output is never rewritten to improve percentages. Old collections retain their original output folders. You can extend again later, with a higher new total.
The new total must exceed the current count and cannot exceed 10,000 or the available combination limit. Combination count alone does not guarantee different pictures. The extension check renders candidate images without exporting them; if there are too few unique images, it rejects the request before changing the target or adding files. For very repetitive projects, the check may stop safely and ask for a smaller total. This check can take time; Cancel leaves the collection unchanged while checking.
After that check succeeds, the new target is saved. Cancelling during generation retains completed items and that target: use Resume in the current screen or Export Resume Collection after reopening. A previously generated collection may contain manually added items; these count toward the new total and participate in duplicate detection. A purely curated collection cannot be extended automatically.

Task: add hand-picked items
Permanent collection production requires active Pro.
- Show the layers/groups for your first item in the editor.
- Choose Export… Add to Collection.
- For a new collection, enter its name, output size and destination folder. There is no generated item-count or group-role control: you choose the visible result yourself.
- Click Add to Collection when Ready to add appears. The first item receives number 00001.
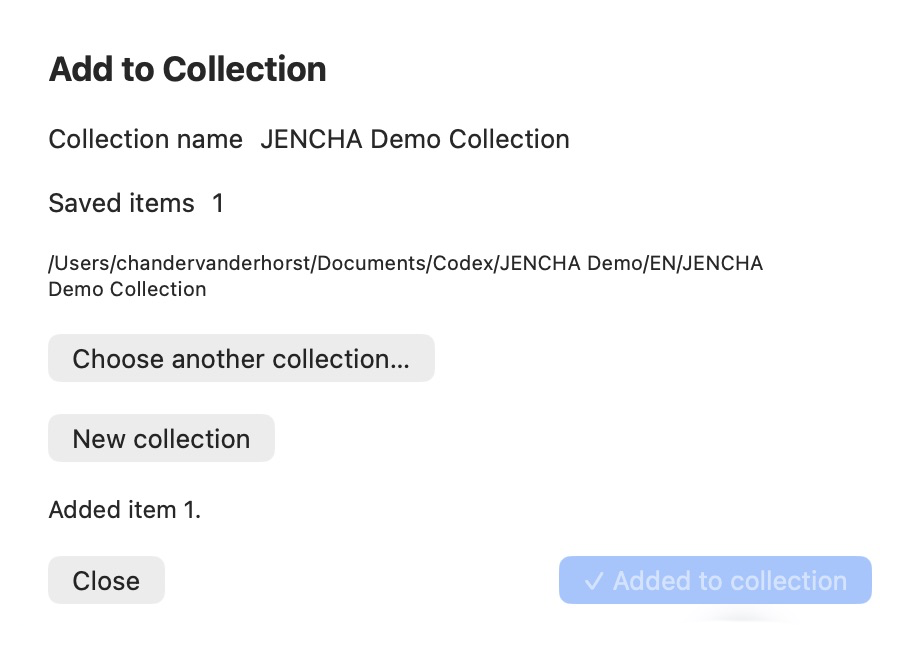
- After success, the button is grey and reads ✓ Added to collection. The item confirmation remains visible; you do not need to click again.
- Close the screen, change visibility to assemble the next item and open Add to Collection again.
- Click Choose existing collection… and select that collection's root folder. Review Saved items and click Add to Collection. Numbering continues with 00002, even after restarting the app.
Choose another collection…, New collection and Close work as described above. A failed addition leaves the ordinary action available so you can address the error. Duplicate detection remains a further safeguard.
For curated continuation, use the same source project. Changing visibility is allowed; changes to pixels, names, layer order, opacity, group structure or other source data require a new collection. Collection name and output size are fixed after creation. This protects consistency with the items already saved.
Distribution does not choose a hand-picked item for you: Add uses the artwork you made visible. Numbering and duplicate checks still apply. Additions to a generated collection count toward its total and toward the targets of a later extension.
Why an item can be a duplicate
- Duplicate combination: the same source layers were chosen again, for example the same Blue layer and Normal-eyes layer.
- Visual duplicate: different layers were chosen, but the final image looks identical at the original canvas resolution. For example, Normal and Laser eyes are both completely covered by a helmet.
The comparison uses actual source-layer choices, not just their names. Use clear, distinct variant names. In Add to Collection, a duplicate is blocked and the message names the existing item number. In Create Collection, duplicates are skipped while the app looks for another unique result. Skips do not leave holes in item numbering.
None in real exported metadata
Optional groups can choose one variant or None. JENCHA Pixel adds None automatically; you do not need an empty layer or transparent image. When None is chosen, no variant from that group appears and the group contributes no trait to either metadata format.
These are real items 1 and 9 from the 400-item Balanced demo. Item 1 has Headwear: Sport Visor. Item 9 has no Headwear property in either format; the other traits remain.

Understand the exported folder
With Collection name JENCHA Demo Collection, a new collection looks like this:
JENCHA Demo Collection/
  Images/
    JENCHA Demo Collection-00001.png
    JENCHA Demo Collection-00002.png
  Bitcoin Inscription Metadata/
    JENCHA Demo Collection-00001.json
    JENCHA Demo Collection-00002.json
  NFT Marketplace Metadata/
    JENCHA Demo Collection-00001.json
    JENCHA Demo Collection-00002.json
  manifest.json
  source.jenchapixel
.jencha-state/ (normally hidden)| File or folder | What it contains and why it matters |
|---|---|
| Images/ | The generated PNG pictures. Open these to see your collection. |
| NFT Marketplace Metadata/ | A JSON description for each individual item. JENCHA Demo Collection-00001.json belongs to image 00001. Its name uses the collection name and item number; properties come from that item's chosen layers/groups. |
| Bitcoin Inscription Metadata/ | Flat key/value descriptions of the same items, including custom Project Details. See chapter 14. |
| manifest.json | JENCHA Pixel's internal record of the whole collection: settings, how many items were made, and where generation should continue. Together with the hidden item records, it supports numbering, used-combination checks, duplicate detection and resume. It is not an artwork's metadata file. |
| source.jenchapixel | A saved copy of the JENCHA Pixel source project on which the collection is based. The app uses it to reproduce the same choices and pictures when resuming. Later editing your original project does not replace this copy. |
| .jencha-state/ | Normally hidden supporting records of saved items and unfinished writes. Leave it in place; the app manages it. |
For one item, metadata may say:
{
  "name": "JENCHA Demo Collection #1",
  "attributes": [
    { "trait_type": "Background", "value": "Blue" },
    { "trait_type": "Eyes", "value": "Normal" }
  ]
}
Here, attributes means properties; trait_type names the category, and value names its chosen variant. An item without included traits still has a JSON file, with an empty properties list. The filename and metadata name refer to the same number, but have different presentation: JENCHA Demo Collection-00001.png / JENCHA Demo Collection-00001.json versus JENCHA Demo Collection #1. You normally do not need to open or edit this text to make a collection.
Leave manifest.json and the internal records alone. Deleting or manually editing them can disrupt numbering, duplicate checks or resume. Keep the entire root folder together and back it up, including hidden contents. For delivery you can copy Images/ and the relevant metadata folder(s), but keep the complete original for continued work. Do not rename, replace or delete individual files inside an active collection.
The manifest also keeps the chosen distribution and percentages. Resume and Extend use those saved settings and take existing items into account. This record describes the whole collection; each exported metadata JSON describes only one item.
Existing collections and common messages
Legacy collections created with images/ and metadata/ retain that layout and single JSON format. No older images or metadata are rewritten to add a second format. Start a new collection for dual metadata. The app explicitly explains this when selecting an older collection.
Existing pictures, metadata and filenames remain unchanged. If a newer collection format is unsupported, keep the folder intact and use a compatible app version.
Missing or modified output blocks continuation. Restore the complete collection from backup rather than inventing replacement state. After a storage error, address the storage problem and select the existing collection folder again. After an interrupted write, reopening may finish the prepared item files. Only one operation can write to a collection at a time.
Collections made before the distribution update retain their original generation behavior, names and folders. There is no Sequential choice for new collections. Start a new collection to use Balanced, Random or Weighted. Older source projects remain readable.
Create is disabled at Weighted? Check the total in every variable group: each must be 100%. All-zero groups are invalid; Optional may use only None at 100%. Percentage settings
A trait is missing? None deliberately leaves its group out of both metadata formats. Check Include in metadata for real selected variants. Real examples

Practical limits
- Up to 10,000 saved items per collection, 256 source layers and 64 groups. Large canvases reach the shared memory limit sooner: 1024 × 1024 allows 16 layers.
- Projects with more than 64 layers require this newer editor. This app still opens older projects; keep backups before exchanging large projects with older builds.
- One item is generated at a time. Keep the destination available and allow enough free disk space. Process-interruption recovery is tested; power loss or hardware failure cannot be guaranteed recoverable.
- Distribution targets are supported. Exact supply guarantees, advanced trait compatibility rules, distribution dashboards, a collection re-export/editing screen and minting are not included. Metadata export does not guarantee compatibility with every marketplace.
Collection Quick Reference: Create = new collection; Resume = finish the saved target; Extend = increase a completed collection; Add = one hand-picked item. Balanced = even mix. Random = chance across the full range. Weighted = per-group targets totalling 100%. Optional None = no layer and no metadata trait. 0% excludes a Weighted choice.
Collection filenames and visible names
New collections use five digits in all three filenames: JENCHA Demo Collection-00001.png, JENCHA Demo Collection-00500.png, through JENCHA Demo Collection-10000.png; both matching JSON files use the identical stem. The visible Name/name is JENCHA Demo Collection #1, JENCHA Demo Collection #500, JENCHA Demo Collection #10000. Create, Resume, Extend and Add all follow the saved collection convention. Extending from 500 makes JENCHA Demo Collection-00501.png with name JENCHA Demo Collection #501.
The collection name chosen at creation is used for both the visible item name and the Bitcoin Collection field. Project Details > Collection name is a starting suggestion, not a later rename of an existing collection.
Older collections keep their original four-digit filenames and their original metadata naming convention, including newly appended items. Existing files are never renamed or rewritten to modernize names. Start a new collection for the new naming convention. Earlier dual-metadata collections also keep four digits; dual metadata alone does not identify the naming convention.
Bitcoin fields are written in this readable order: Name, Collection, Description, Website, custom Project Details, then traits in group order. Empty optional fields are omitted. Marketplace fields are name, description, external_url, attributes; custom fields and Collection are not inserted there. Group/layer text remains literal: cap_blue does not become “Cap Blue”.
Website is optional. Enter a complete https:// or http:// URL, for example https://pixel.jencha.com; the app does not add a prefix or rewrite your URL. Invalid input is reported when saving Project Details or exporting new JSON. Historical projects still open with old values so you can correct them. Existing legacy collections retain their frozen export data. A multiline description stays multiline; JSON represents the line break as \n, and reading it returns the same text.